<?xml version="1.0" encoding="utf-8"?>
<feed xmlns="http://www.w3.org/2005/Atom">

  <title><![CDATA[The Open Network Geek Blog]]></title>
  <link href="http://opennetgeek.github.io/atom.xml" rel="self"/>
  <link href="http://opennetgeek.github.io/"/>
  <updated>2016-06-26T04:56:06-06:00</updated>
  <id>http://opennetgeek.github.io/</id>
  <author>
    <name><![CDATA[Diego Dompe]]></name>
    
  </author>
  <generator uri="http://octopress.org/">Octopress</generator>

  
  <entry>
    <title type="html"><![CDATA[OpenSwitch Containers ♥ GNS3]]></title>
    <link href="http://opennetgeek.github.io/blog/2016/06/25/openswitch-containers-gns3/"/>
    <updated>2016-06-25T23:09:46-06:00</updated>
    <id>http://opennetgeek.github.io/blog/2016/06/25/openswitch-containers-gns3</id>
    <content type="html"><![CDATA[<p><img class="center" src="http://opennetgeek.github.io/images/OpenSwitchDocker.png" title="OpenSwitchDocker" alt="OpenSwitchDocker"></p>

<p><div class="toc"/></p>

<p>In one of my <a href="http://opennetgeek.github.io/blog/2016/05/05/setting-up-dc-fabric-simulation-with-openswitch-and-gns3/">previous articles</a>,
I elaborated on a setup to create DC fabric simulations with GNS3 and OpenSwitch.
I also promised to follow up with some post about using Ansible with it.</p>

<p>Well, I have been a bit distracted with some changes to the setup before moving into
the Ansible details (to say true, I got the Ansible article almost ready, but things
are moving so fast, that I keep rewriting it).</p>

<p>One of the things that &lsquo;change everything&rsquo; recently was the
<a href="https://www.gns3.com/news/article/what-s-new-in-gns3-v1-5">release of GNS3 1.5</a>.
This is a great release that includes several features that makes using OpenSwitch with GNS3 awesome:</p>

<ul>
<li>Support for Docker containers! This enables OpenSwitch to be a container instead of
a VM, allowing to scale better:

<ul>
<li>This obviously consumes less RAM memory and use it more efficiently.</li>
<li>We are no longer limited to 8 ports per node (VirtualBox&rsquo;s restriction), but
instead we can have as many ports as you want. Even more, the OpenSwitch Appliance
container will change the number of ports available, based on the GNS3 configuration.</li>
</ul>
</li>
<li>Support for portable projects! Now you can export your project and shared it
with others (restrictions apply).</li>
</ul>


<p>Let&rsquo;s see how to use this new release with OpenSwitch Appliance Container.</p>

<p><!--more--></p>

<h1>Using the GNS3 VM</h1>

<p>The first recommendation when using the container setup for GNS3, is to use the
GNS3 VM (even when using a native Linux host). Why?</p>

<ul>
<li>Well, for running containers on Linux or Windows, you need the GNS3 VM.
<div class="callout bottom-left">
Yeah, even if you have docker for Linux/Windows, GNS3 can create the virtual interfaces
for them on these platforms.
</div></li>
<li>Right now the only way to create a portable way to connect to the external world is to
use the <a href="https://www.gns3.com/marketplace/appliance/internet-for-gns3vm">GNS3 Internet VM Appliance</a>,
and this only works inside the GNS3 VM.</li>
<li>With GNS3 1.5, you can setup a remote GNS3 VM machine, allowing to deploy
a powerful VM for running your simulations without starving your laptop.</li>
<li>Also with the GNS3 VM, there is a simplified process for setting up a proxy when
working in a corporate environment.</li>
</ul>


<p>Since we will be using qemu appliances inside the GNS3 VM, you need a virtualization
platform that supports nested virtualization. That means you are either using a
VMware desktop solution (Workstation, Player or Fusion), or if using ESXi, be sure
to <a href="http://www.virtuallyghetto.com/2012/08/how-to-enable-nested-esxi-other.html">enable the VHV flag</a>.</p>

<h2>Installing the GNS3 VM</h2>

<p>Download the VM <a href="https://github.com/GNS3/gns3-gui/releases">from here</a>. Be sure to download the
right image for either desktop solution or ESXi.</p>

<p>You will need at least version 1.5.0, but if you are behind a corporate firewall, you will need version
1.5.1 that <a href="https://github.com/GNS3/gns3-vm/issues/75">fixes a bug when configuring the proxy settings</a>.</p>

<p>After downloading the GNS3 VM appliance, import it into your virtualization solution, and reconfigure
with this minimal hardware requirements:</p>

<ul>
<li>512MB of RAM for every OpenSwitch container that you plan to run. For our examples 6GB of RAM should be enough.</li>
<li>2 CPU cores. If you can afford more, the better.</li>
</ul>


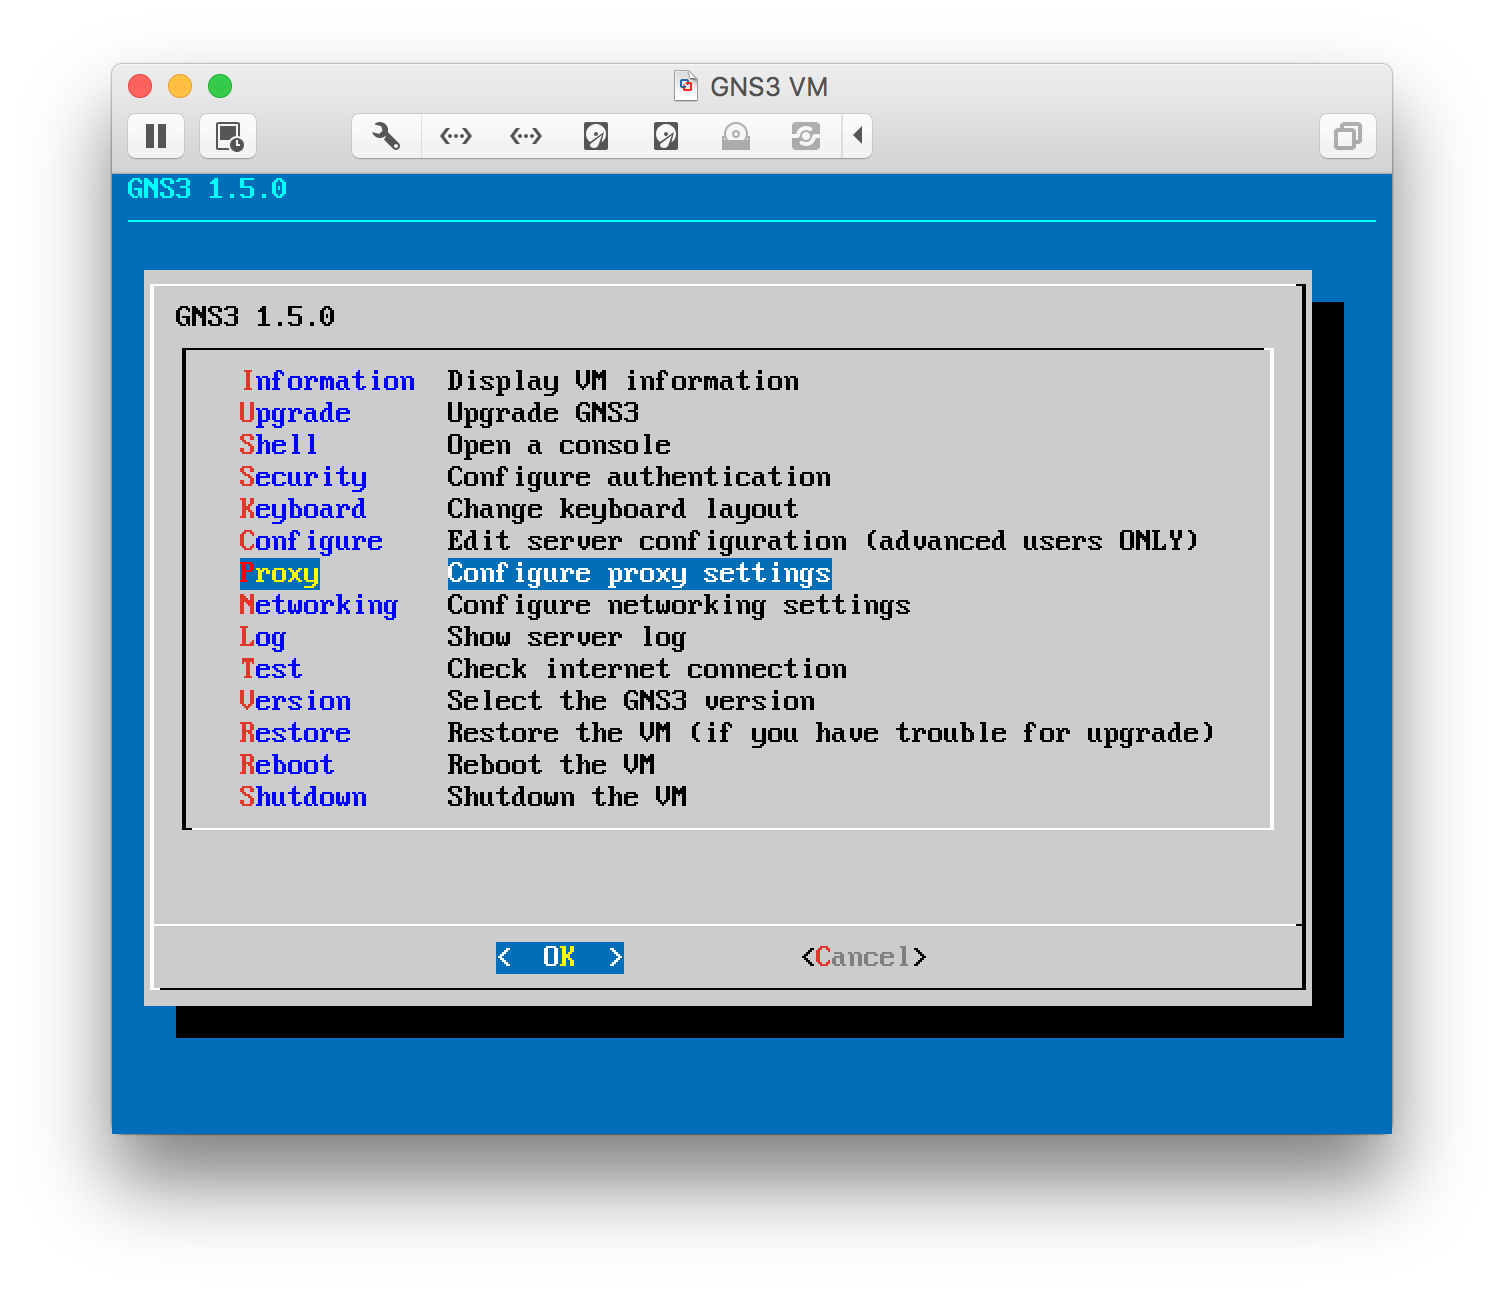
<p>If you are behind a corporate firewall, be sure to turn on the VM, and using the menu displayed when the VM boots,
configure the proxy settings.</p>

<p><img class="center no-border" src="http://opennetgeek.github.io/images/gns3containers/proxy.png"></p>

<h2>Configure GNS3 to use the VM</h2>

<p>If you haven&rsquo;t already, install GNS3 downloading <a href="https://github.com/GNS3/gns3-gui/releases">from here</a>
(be sure to use the same version as the VM image that you downloaded).</p>

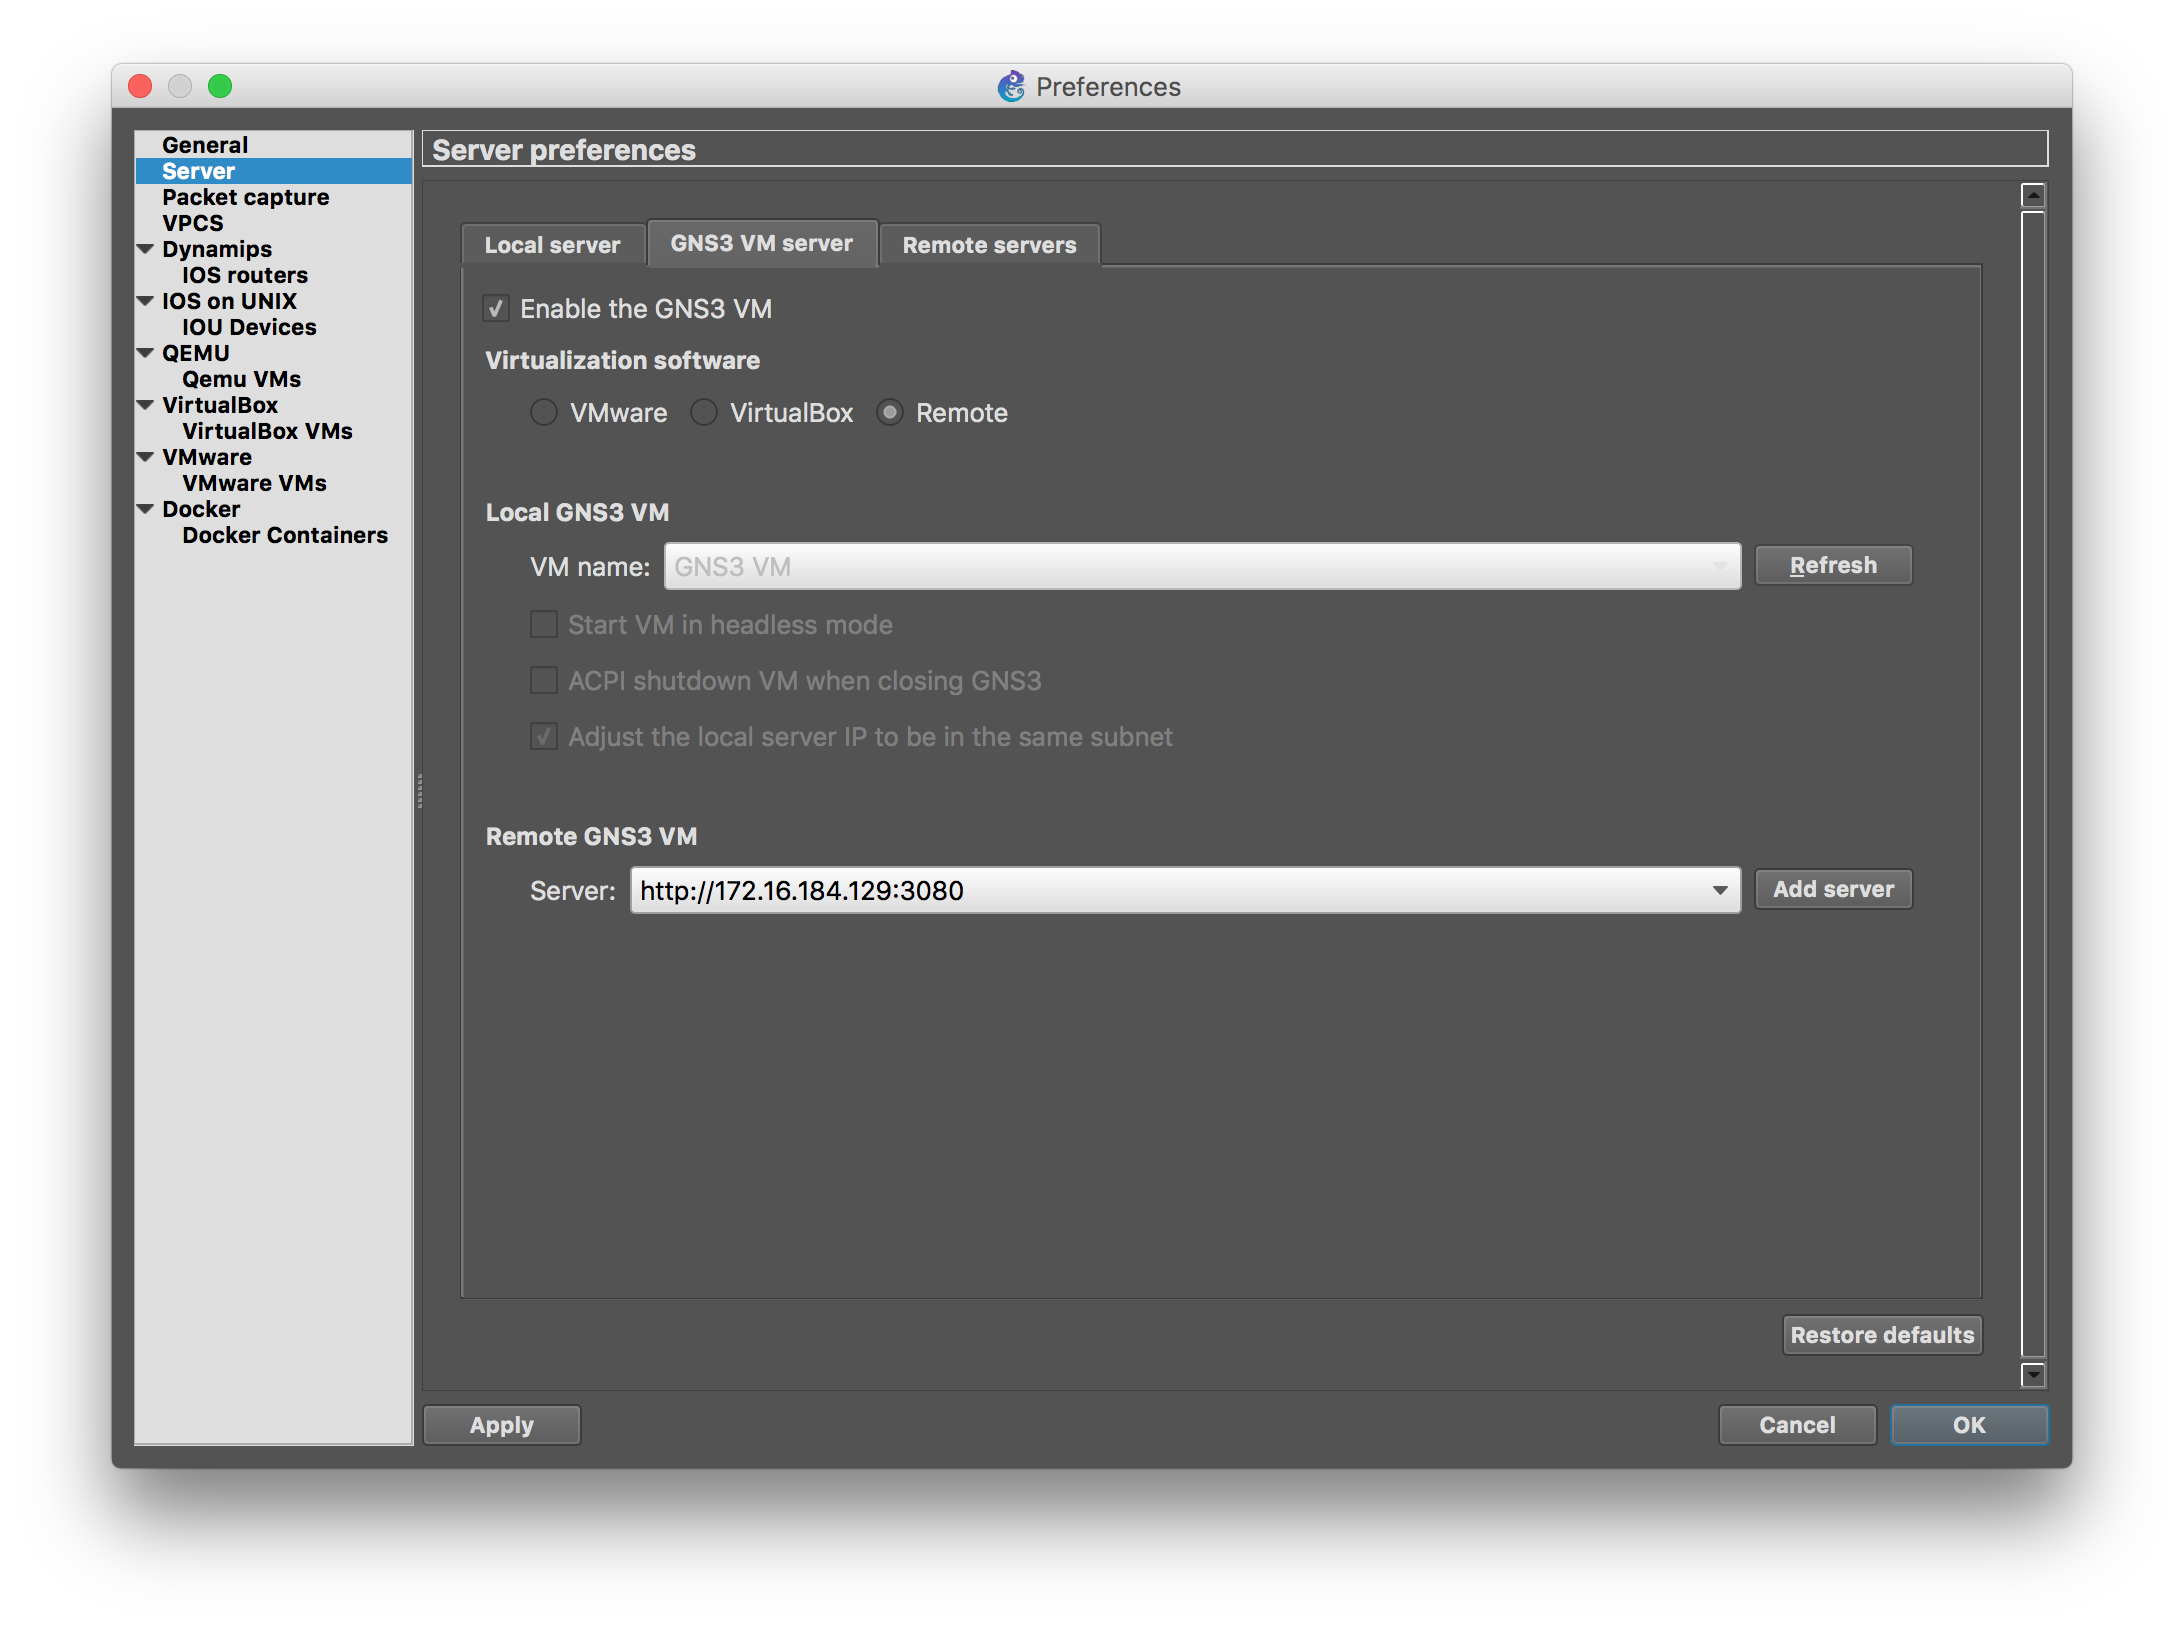
<p>When configuring GNS3, the wizard doesn&rsquo;t allow you to configure a remote server GNS3 VM, but
you can abort the wizard, and add it later from the preferences panel (the IP address of
the VM is show on the information page displayed by the VM on boot, or available from the
text menu on the VM as well).</p>

<p><div class="callout bottom-left">
I found that when working behind a proxy, the VM only works well as a remote server,
since somehow the communication with it cannot be established by the UI in the presense
of a proxy (I have only experienced this with <strike>OS-X</strike>macOS environment, not sure if
happens on Windows or Linux).
</div></p>

<p><img class="center no-border" src="http://opennetgeek.github.io/images/gns3containers/gns3vm-preferences.png"></p>

<h1>Using the OpenSwitch Docker Appliance with GNS3</h1>

<p>In order to use OpenSwitch as a container with GNS3, you have to main options:
use an existing image (easier one), or build a custom one from scratch (useful for developers).</p>

<h2>Using an Existing OpenSwitch Container Image</h2>

<p>Let&rsquo;s focus on the simple procedure first. Fortunately we no longer need to specify multiple
parameters on the UI to create a template, since for Docker containers we can use
a pre-defined template appliance (.gns3a file), that will do all the configuration
for you.</p>

<ul>
<li><p>First, download a GNS3 appliance template from the list
<a href="https://archive.openswitch.net/gns3/">available here</a>.</p></li>
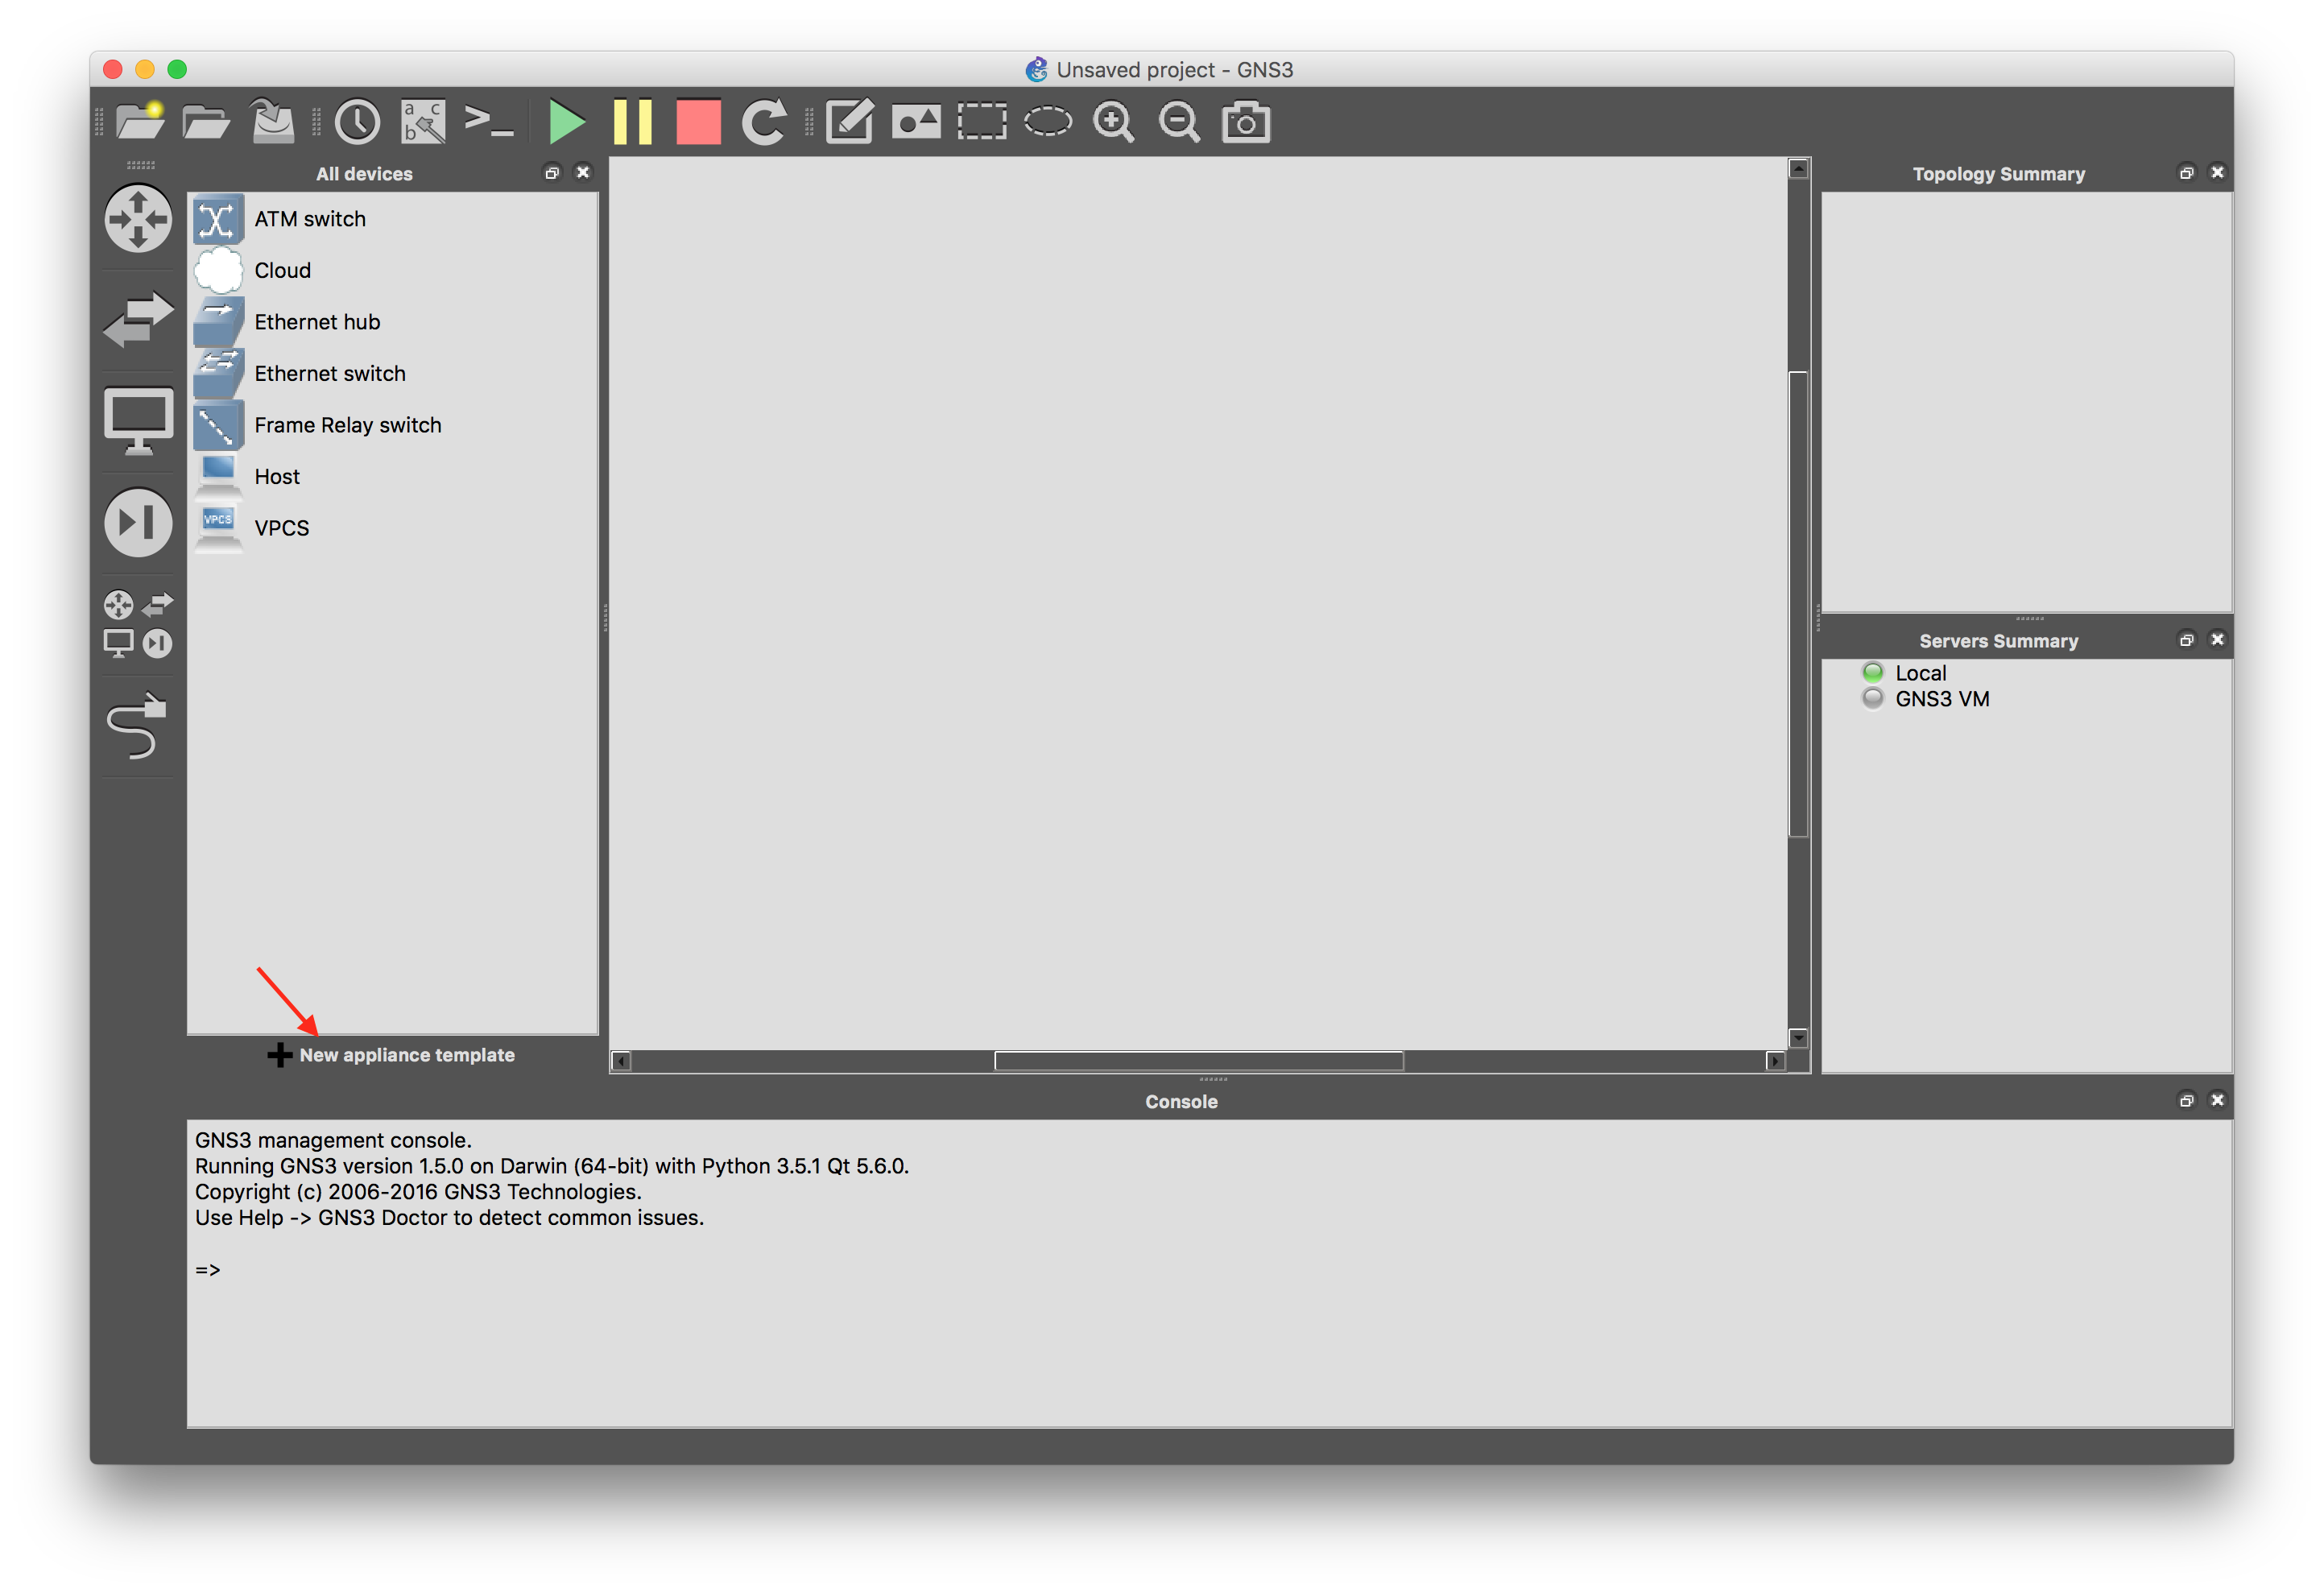
<li><p>Next, import it into GNS3: there is a new &lsquo;Import appliance template&rsquo; button under
the device panel.</p>

<p><img class="center no-border" src="http://opennetgeek.github.io/images/gns3containers/import1.png"></p>

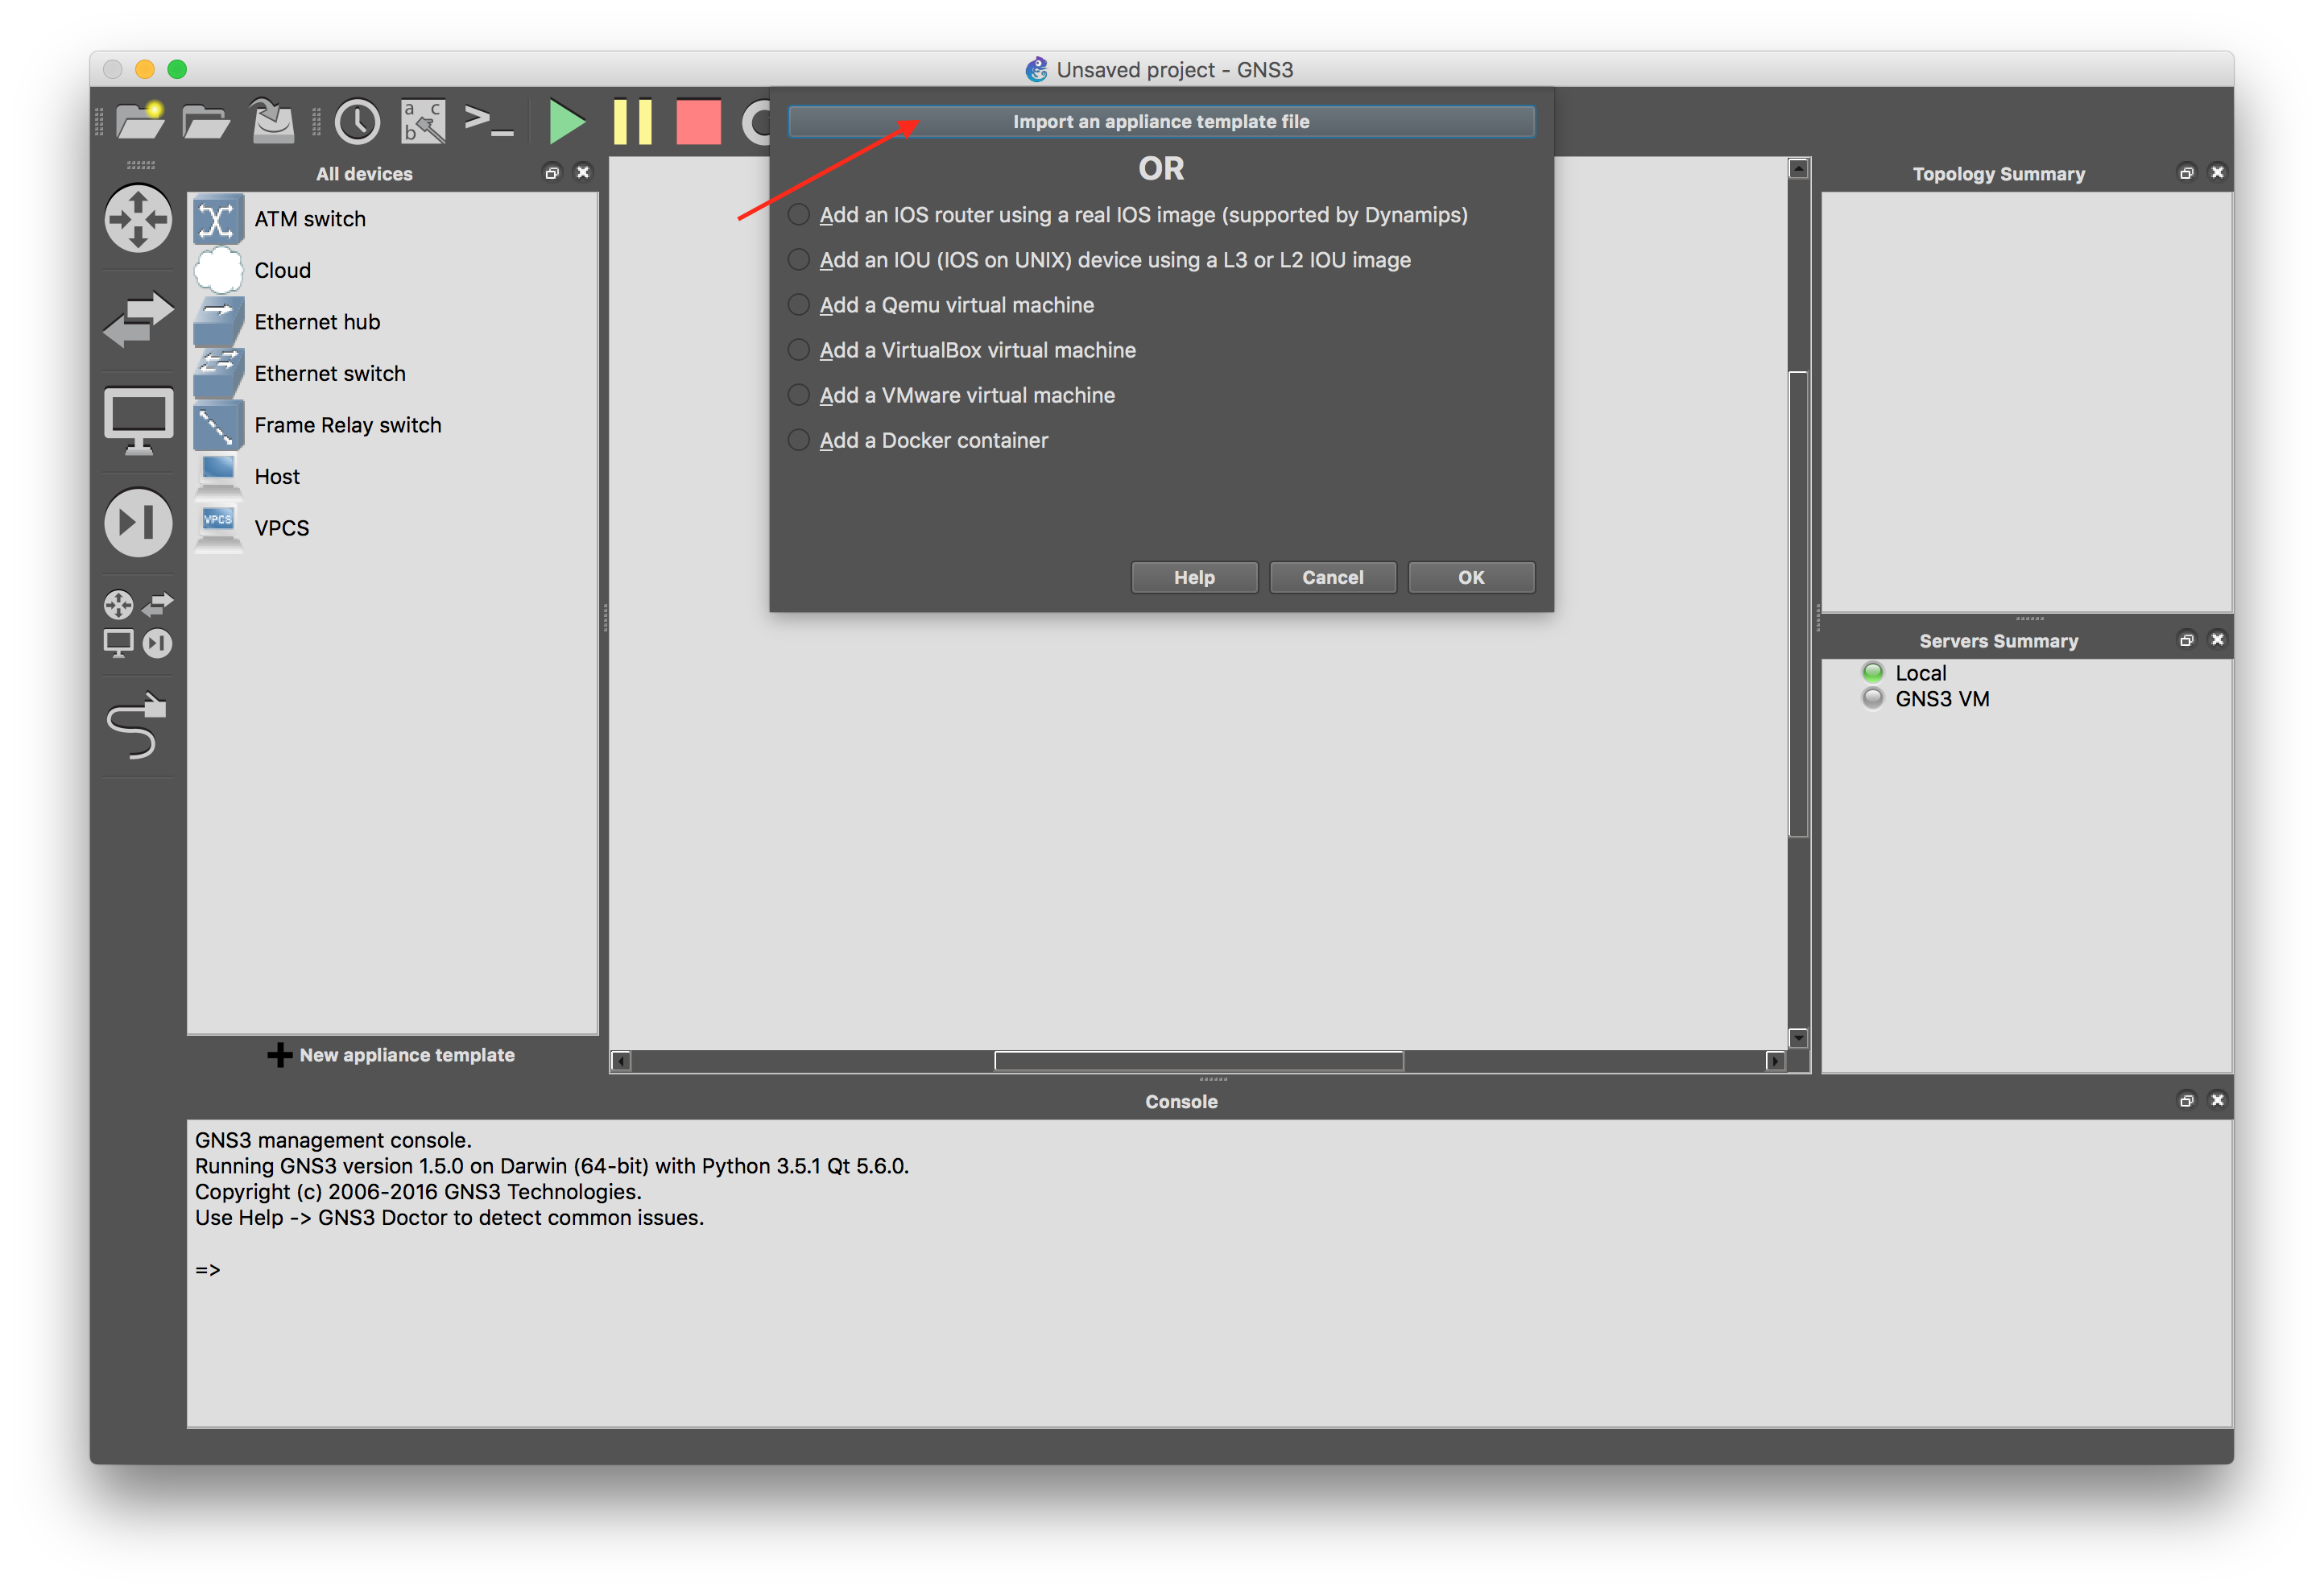
<p>Select &lsquo;Import an appliance template file&rsquo;</p>

<p><img class="center no-border" src="http://opennetgeek.github.io/images/gns3containers/import2.png"></p>

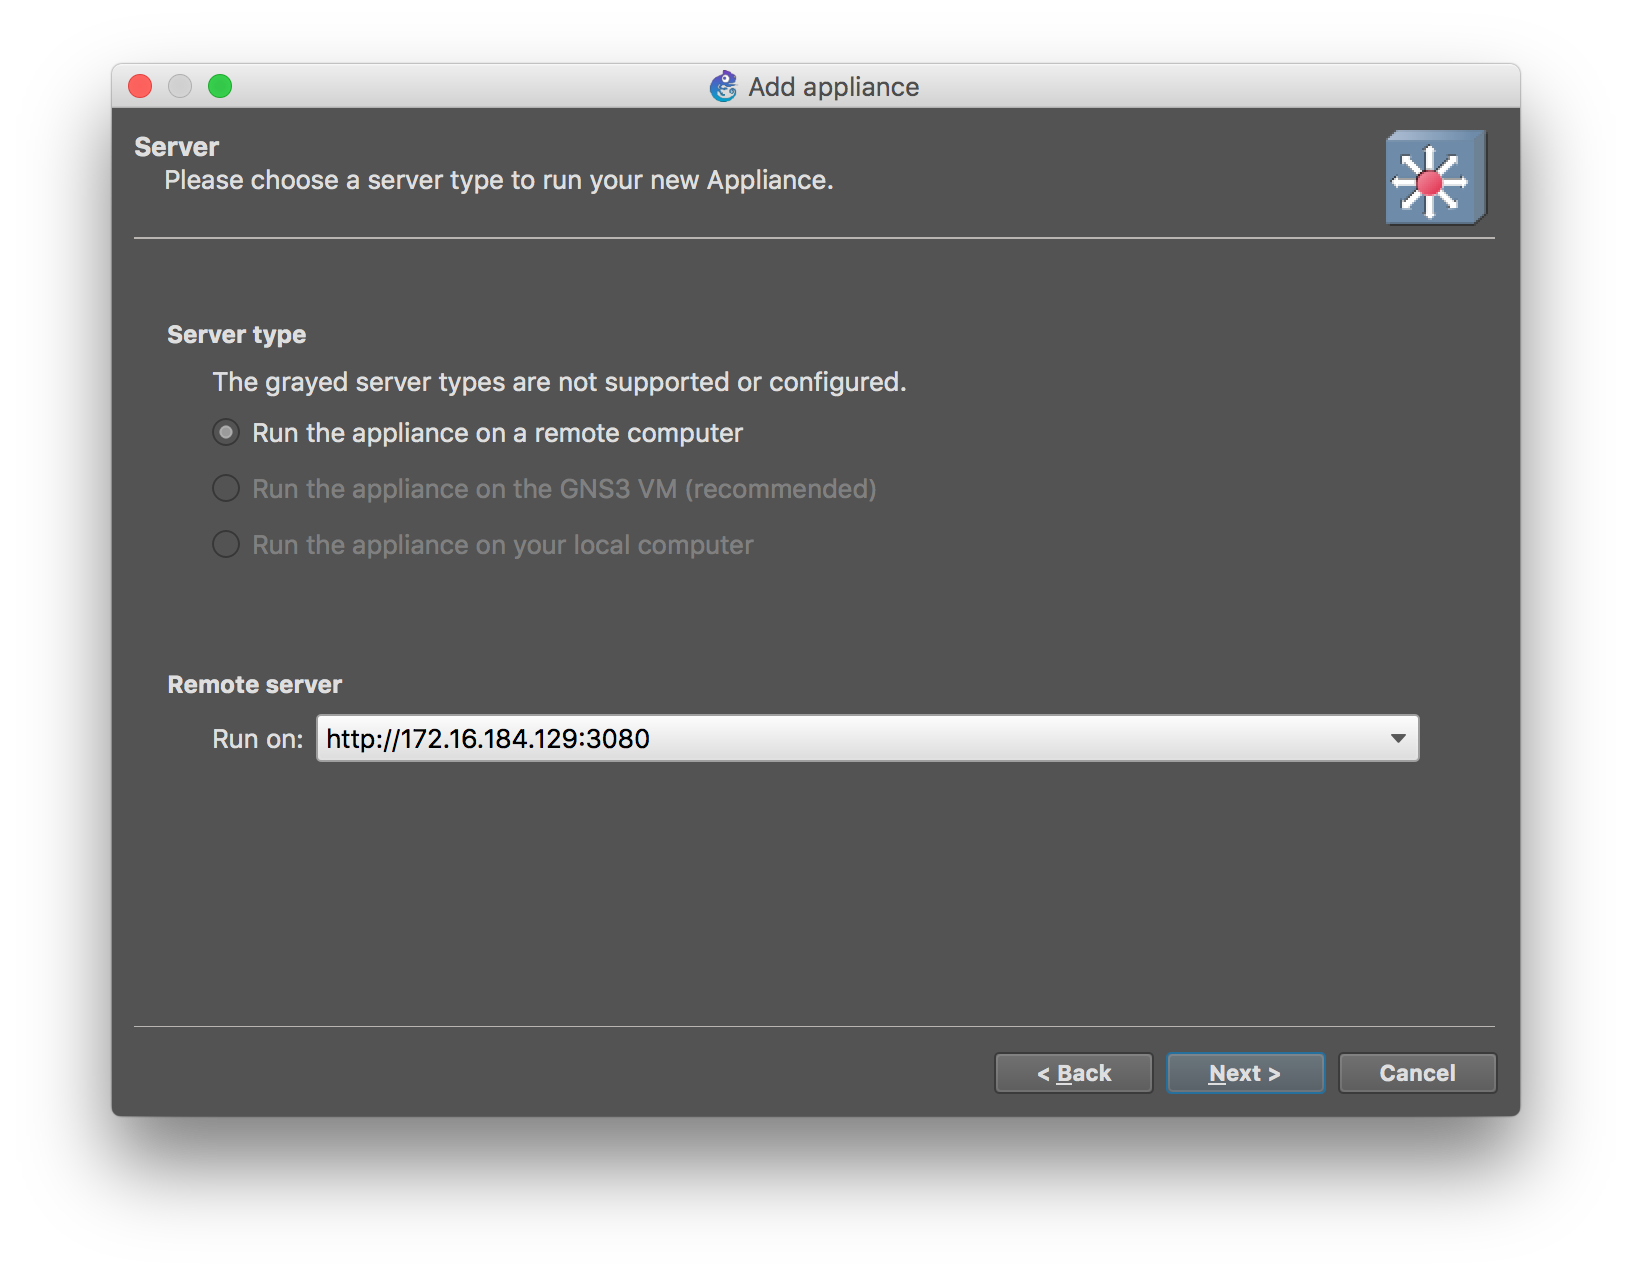
<p>Select the template that you downloaded, and follow the rest of the wizard. Select
to run on the remote server running the GNS3 VM.</p>

<p><img class="center no-border" src="http://opennetgeek.github.io/images/gns3containers/import3.png"></p></li>
</ul>


<p><img class="img-right-callout" src="https://archive.openswitch.net/logo/OpenSwitchDockerStencil.png"></p>

<p>Once you are done with the import, you can download a custom stencil for OpenSwitch
Docker Appliance <a href="https://archive.openswitch.net/logo/OpenSwitchDockerStencil.png">from here</a>,
and customize the template to use it.</p>

<p>The template uses by default 8 ports, but that can be adjusted in per machine instance.</p>

<p>That&rsquo;s all it takes, you are ready to drag &amp; drop container instances into GNS3!</p>

<h2>Creating a custom Container Image</h2>

<p>In the previous step where we used the .gns3a file, it points to a published version
of the container in the Docker Hub, but you may want to create your own container from
scratch with the latest code or modifications. If that is not the case, you can skip
this section.</p>

<p>First you will have to build an image for the appliance target as explained in
previous articles (you can also download the tarball for a periodic build from
the <a href="https://archive.openswitch.net/artifacts">artifact archives</a>).</p>

<p><div class="callout bottom-left">
An important clarification: if you are a developer from OpenSwitch, you may be used
to know the &lsquo;genericx86-64&rsquo; target as the container image used for testing purposes. However
on GNS3, we actually use the OpenSwitch Appliance images. This have implications on the
naming of the ports (ports are called ethX).
</div></p>

<p>Now, the default tarball created for the appliance is designed to run in a VM, so
it needs some small modifications to run properly on a container. I have automated
the steps in a <a href="https://github.com/ddompe/ops-gns3-docker/blob/master/openswitch/Dockerfile">docker file here</a>.</p>

<p>Here are the example commands to create a custom image with the latest code from
master and push into the docker hub (in this example I use my docker hub account):
<figure class='code'><div class="highlight"><table><tr><td class="gutter"><pre class="line-numbers"><span class='line-number'>1</span>
<span class='line-number'>2</span>
<span class='line-number'>3</span>
<span class='line-number'>4</span>
<span class='line-number'>5</span>
<span class='line-number'>6</span>
</pre></td><td class='code'><pre><code class=''><span class='line'>mkdir ops-gns3-docker
</span><span class='line'>curl <a href="https://archive.openswitch.net/artifacts/periodic/master/latest/appliance/openswitch-appliance-image-appliance-ops-0.4.0-master+2016063012.tar.gz">https://archive.openswitch.net/artifacts/periodic/master/latest/appliance/openswitch-appliance-image-appliance-ops-0.4.0-master+2016063012.tar.gz</a> &gt; openswitch-appliance-image.tar.gz
</span><span class='line'>wget <a href="https://raw.githubusercontent.com/ddompe/ops-gns3-docker/master/openswitch/Dockerfile">https://raw.githubusercontent.com/ddompe/ops-gns3-docker/master/openswitch/Dockerfile</a>
</span><span class='line'>docker build -t ddompe/openswitch-appliance:latest .
</span><span class='line'>docker login
</span><span class='line'>docker push ddompe/openswitch-appliance:latest</span></code></pre></td></tr></table></div></figure></p>

<p>Now you can modify the gns3a file provided in the previous step and point to your
customized image to import it into GNS3.</p>

<h1>Creating a topology for Ansible experimentation</h1>

<p>Now, let&rsquo;s create a topology for creating a DC Fabric simulation with Ansible similar
to the one described in the <a href="http://opennetgeek.github.io/blog/2016/05/05/setting-up-dc-fabric-simulation-with-openswitch-and-gns3/">previous article using virtual machine appliances</a>.</p>

<p>I have created a docker container that already automated all the steps detailed in
the previous article, and is suitable to be run as a systemd container. The Dockerfile
could be found <a href="https://github.com/ddompe/ops-gns3-docker/tree/master/dc-controller">here</a>, and
the GNS3 template file <a href="https://archive.openswitch.net/gns3/ansible-controller.gns3a">here</a>.</p>

<p>Unlike the previous examples using VirtualBox, we cannot longer use the cloud element
to get a NAT connection to the external world, so instead we will use the
<a href="https://www.gns3.com/marketplace/appliance/internet-for-gns3vm">GNS3 Internet VM Appliance</a>.</p>

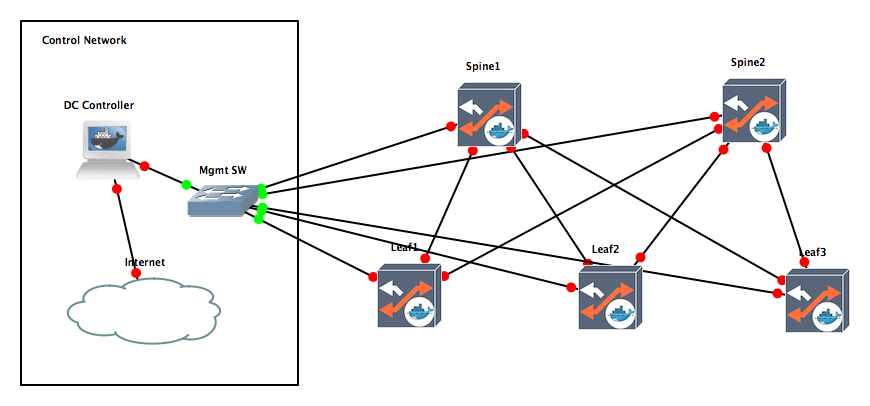
<p>After installing those two templates, we can recreate the DC fabric similar to the one
from the previous article, with the difference that is (almost) all containers.</p>

<p><img class="center no-border" src="http://opennetgeek.github.io/images/gns3containers/topology.png"></p>

<h1>Sharing portable projects</h1>

<p>Now comes another cool part, you can export and import the project to share with
others.
<div class="callout bottom-left">
Yes, that means you can ignore everything I just said about importing templates
and drawing topologies and just download a file with everything ready.
I know I could have started saying this, but where is the fun if not in do it by
yourself?
</div></p>

<p>So, you can export the project by using &lsquo;Export portable project&rsquo; on the file
menu. It will ask you if you wan to include any base image, which for our example
I would recommend we do (this will pack the qemu image used by the GNS3 Internet Appliance).
Docker images won&rsquo;t get included on the file, but instead will be automatically
downloaded from the docker hub when someone imports the project.</p>

<p>Talking about importing the project back, there is currently a <a href="https://github.com/GNS3/gns3-gui/issues/1336">bug when importing
the project and downloading the docker images</a>,
where certain imports may timeout. This is fixed for 1.5.1, but in the meantime you can workaround by deleting the
project that failed to import and re-import it again (since the docker images should
be already downloaded, it won&rsquo;t fail the second time).</p>

<p>The portable project file for the example on this article is
<a href="https://archive.openswitch.net/gns3/dc-fabric-example.gns3project">here</a>, in case you
want to get up an running.</p>

<h1>Next Steps</h1>

<p>Isn&rsquo;t all of this really exciting? Thanks to the GNS3 team for their awesome work
and their responsiveness to fix the bug/enhancements that I keep throwing at them.</p>

<p>In the next article I will continue with explaining how to use Ansible to deploy
configuration to the topology we build here.</p>

<p>Stay tuned.</p>
]]></content>
  </entry>
  
  <entry>
    <title type="html"><![CDATA[OpenSwitch Meets P4]]></title>
    <link href="http://opennetgeek.github.io/blog/2016/05/18/openswitch-meets-p4/"/>
    <updated>2016-05-18T21:02:01-06:00</updated>
    <id>http://opennetgeek.github.io/blog/2016/05/18/openswitch-meets-p4</id>
    <content type="html"><![CDATA[<p><img class="center" src="http://opennetgeek.github.io/images/ops-p4-sticker.png"></p>

<p><strong>Note</strong>: This article was <a href="https://opennetgeek.wordpress.com/2016/05/09/openswitch-meets-p4/">originally published here</a>.</p>

<p>Before moving on the next post to continue our saga of OpenSwitch
<a href="http://opennetgeek.github.io/blog/2016/05/05/setting-up-dc-fabric-simulation-with-openswitch-and-gns3/">Simulations with
GNS3</a>,
I wanted to take a quick deviation to document a subject that gets a lot
of attention these days: <a href="http://p4.org">P4</a>.</p>

<p>In case you have been missing all the action around P4, the 30,000 feet view is that it&rsquo;s a
language to describe forwarding pipelines (and no, it&rsquo;s not the same as
OpenFlow, that is useful for programming entries in
almost-always-pre-defined pipelines). One of the
(<a href="http://events.linuxfoundation.org/sites/events/files/slides/4-%20Chang.pdf">many</a>)
nice things about this is that you can potentially &lsquo;compile&rsquo; your
pipeline definition into an executable program that provides a
functional simulation of a P4-based ASIC. Did I mention the tools for
doing all of this are <a href="http://p4.org/code/">available as open source</a>?</p>

<h2>What does P4 has to do with OpenSwitch?</h2>

<!--more-->


<p>Well, as I mention in previous posts, OpenSwitch provides a simulation
environment that provides a software data path for testing and training
purposes, and we package it as either container or VM appliance. So far
the default software data path is provided by running an stock
OpenVSwitch that&rsquo;s under control of the switchd plugin for simulation.</p>

<p>However, since Barefoot Networks is a contributing member to the
OpenSwitch project, they have been adding support for using a P4 backend
that allows replace the simulation &lsquo;ASIC&rsquo; to a P4 functional model of an
ASIC. Some details about it can be found in their <a href="https://archive.openswitch.net/presentations/Meetups/March_2016/OPS_Meetup_March2016_BFN_P4.pdf">presentation from the
last OpenSwitch
Meetup</a> (if
you are interested on OpenSwitch, there were several interesting
presentations on that Meetup. You can watch them
<a href="https://www.youtube.com/watch?v=u-eWetiNieU">here</a>).</p>

<p>Since OpenSwitch is not married to a particular interface for the ASIC SDK (reports
otherwise are greatly exaggerated!), the P4 backend provides a <a href="http://git.openswitch.net/cgit/openswitch/ops-switchd-p4switch-plugin/">native
plugin for
switchd</a>
to use their &lsquo;PD&rsquo; APIs directly.</p>

<div class="callout bottom-left">
Exercise to the reader: Barefoot is a big supporter of 
<a href="https://github.com/opencomputeproject/SAI">SAI</a> and they can generate
the SAI shim as well, so it would be interesting to use it with the 
<a href="http://git.openswitch.net/cgit/openswitch/ops-switchd-sai-plugin/">SAI plugin</a>
that Mellanox is contributing to OpenSwitch.
</div>


<h2>Shut Up and Take my Bitcoin!</h2>

<p>OK, OK, how to run with the P4 data path? OpenSwitch still doesn&rsquo;t
provide P4 periodic images, so you have to build the code yourself.
These are the steps you need to do to flip into the P4 backend (assuming
you already have a working build environment for either container or
appliance):</p>

<figure class='code'><div class="highlight"><table><tr><td class="gutter"><pre class="line-numbers"><span class='line-number'>1</span>
<span class='line-number'>2</span>
</pre></td><td class='code'><pre><code class=''><span class='line'>rm -Rf build/tmp # Flush file system dependencies
</span><span class='line'>echo "EXTRA_IMAGE_FEATURES += \"ops-p4\"" &gt;&gt; build/conf/local.conf</span></code></pre></td></tr></table></div></figure>


<p>Now, run &lsquo;make&rsquo; and go for a coffee while the image get&rsquo;s build. It
wasn&rsquo;t that hard, was it?</p>

<p>One more thing™, if you are using the
appliance environment, verify your code already includes <a href="https://review.openswitch.net/#/c/8590/">this
commit</a>, or otherwise
cherry-pick the change.</p>

<div class="callout bottom-left">
<i class="fa fa-2x fa-exclamation-triangle" aria-hidden="true"></i><br><br>
Buyer beware: P4 is an experimental feature, so don't expect everything
to be smooth right now ;). That said, the plan for OpenSwitch moving
forward is to deprecated the OpenVSwitch backend in favor of the P4
implementation as the default implementation for simulations.
</div>


<h2>How to use the P4-based Image?</h2>

<p>Pretty much the same way that you use the regular simulator image. If
you are using the P4 Image with GNS3, you can download this special
edition
<a href="https://archive.openswitch.net/logo/OpenSwitchP4Stencil.png">stencil</a> I
did for it.</p>

<p>One interesting fact that you may notice when using the P4
simulator, is that control packets into the CPU have higher latency.
This is caused because the PDUs are going thru a TAP device from the
switch process (in userspace) into the netdev interfaces in the SW
namespace.</p>

<h2>Final thoughts</h2>

<p>This kind of experimentation wasn&rsquo;t possible a couple years ago, and
software stacks like SAI and P4 are changing the landscape along with
OpenSwitch. Think that you can change the forwarding data path
implementation, rebuild the simulator, and integrate back again with
your NOS stack! is mind boggling.</p>

<p>So, indeed, &lsquo;software is eating the world&rsquo;. Happy hacking!</p>
]]></content>
  </entry>
  
  <entry>
    <title type="html"><![CDATA[Setting Up DC Fabric Simulation With OpenSwitch and GNS3]]></title>
    <link href="http://opennetgeek.github.io/blog/2016/05/05/setting-up-dc-fabric-simulation-with-openswitch-and-gns3/"/>
    <updated>2016-05-05T19:31:32-06:00</updated>
    <id>http://opennetgeek.github.io/blog/2016/05/05/setting-up-dc-fabric-simulation-with-openswitch-and-gns3</id>
    <content type="html"><![CDATA[<p><img class="center" src="http://opennetgeek.github.io/images/google-datacenter-tech-03.jpg"></p>

<p><strong>Note</strong>: This article was <a href="https://opennetgeek.wordpress.com/2016/05/05/setting-up-dc-fabric-simulation-with-openswitch-and-gns3/">originally published here</a>.</p>

<p>In the <a href="http://opennetgeek.github.io/blog/2016/04/20/using-openswitch-appliance-with-gns3/">previous
post</a> I
covered the basics about setting up the OpenSwitch Appliance using GNS3.
The setup was fairly simple: two switches connected to each other and
exchanging LLDP packets. In this post we will setup a more elaborate
network to simulate a DC fabric (although it may be a bit <a href="https://kontrolissues.net/2015/03/27/sometimes-size-matters-im-sorry-but-youre-just-not-big-enough/">overkill of a
setup</a>).
The setup will be the basis for the next posts about configuring this
fabric using Ansible.</p>

<p>One of the first questions when setting up a complex topology with GNS3
that most people will do is: how do I connect
it to the external world outside of the simulation? For VirtualBox
machines that we are using, the options are limited. The one I found to
work reliably across platforms was to use a NAT connection. This has the
disadvantage that we have limited connectivity from the external world
toward the internal network, but this could be also a security advantage
to prevent accidental propagation of control protocols from our
simulated environment.</p>

<p>Since the purpose of this lab is going to be to play with Ansible, we are
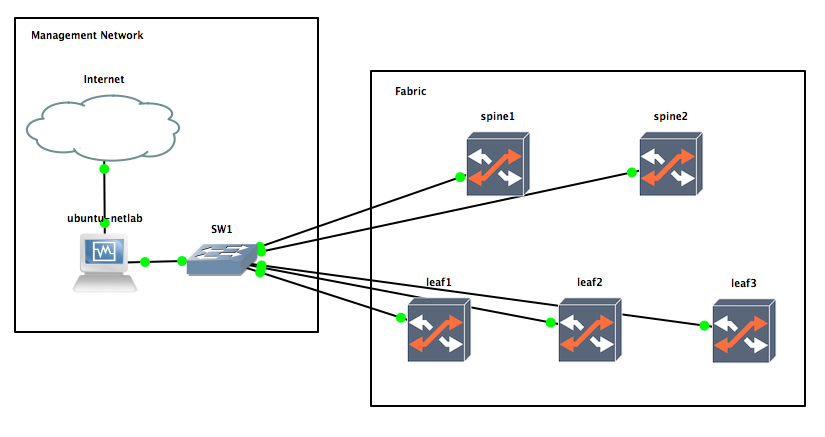
going to need a Linux machine to run it. So, we will setup the following network:</p>

<p><img class="center no-border" src="http://opennetgeek.github.io/images/mgmt1.png"></p>

<p>Let&rsquo;s elaborate on the setup details:</p>

<!--more-->


<ul>
<li>The &lsquo;Internet&rsquo; cloud is a GNS3&rsquo;s cloud element, that I configured
with a NAT entry that I named &lsquo;nat&rsquo;. The name doesn&rsquo;t really matter,
as GNS3 just need to see a NAT interface on the cloud element, so
that the connection to the VM called &lsquo;ubuntu-netlab&rsquo; is configured
using VirtualBox&rsquo;s NAT networking.</li>
<li>The &lsquo;ubuntu-netlab&rsquo; is a virtual machine that have Ubuntu 16.04
Server installed on it (instructions about this setup below). This
VM will have two NICs: one attached to the NAT connection
and another one to the SW1 that will be the management network of
the switches. What we will be doing with this machine? Several
things:

<ul>
<li>Run a DHCP server to provide IP connectivity to the management
network</li>
<li>Run a DNS relay to minimize disruptions on the configuration (I
may be roaming between home/office).</li>
<li>You may optionally configure IP masquerading (aka NAT) on this
box to allow the OpenSwitch boxes to reach the external world,
but is not really required.
<div class="callout bottom-left">
You may be wondering why not connect the management switch
directly to the NAT port on the cloud element? I tried this, and
found the DHCP server shipping in VirtualBox was not really
good, and sometimes will assign the same IP address to different
boxes if restarted at a given time (bug with the leases?)
</div></li>
<li>We will install Ansible on this box, and use it as control
machine to configure the fabric</li>
</ul>
</li>
<li>The SW1 is a GNS3' ethernet switch with 8 ports. One will be
connected to the Ubuntu VM, and the other ports to each of the
management ports of the OpenSwitch boxes.</li>
<li>We will use 5 OpenSwitch boxes to create a simple datacenter fabric.
I&rsquo;m calling them spines/leaves for convenience, but I will do
examples with plain L2, and other L3 topologies that may not be a
CLOS.</li>
</ul>


<p>So, let&rsquo;s get started with the setup!</p>

<h2>Setup the Management Network</h2>

<p>You should start by dragging a cloud element and configuring it to have
a network interface of type NAT:</p>

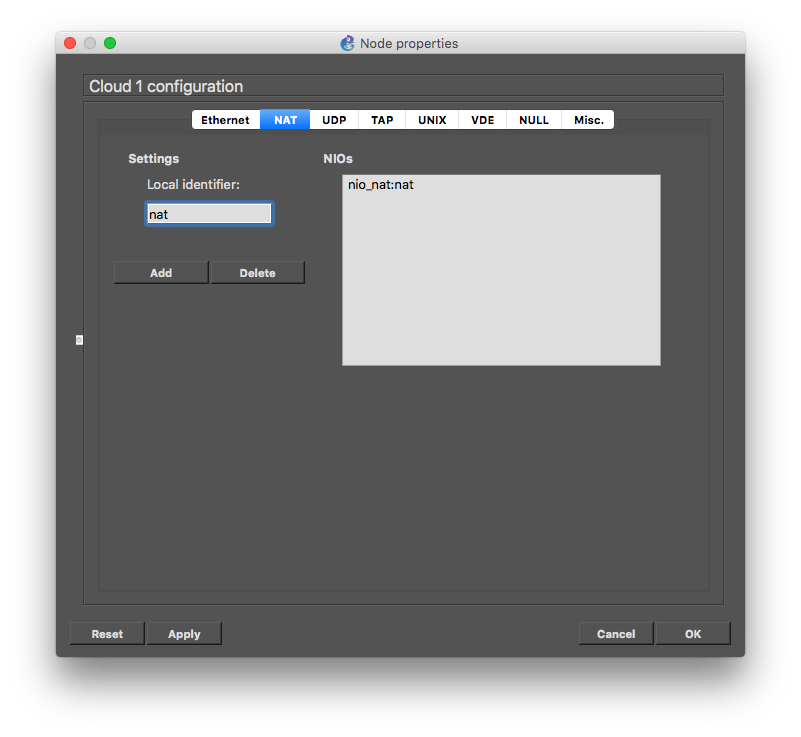
<p><img class="center no-border" src="http://opennetgeek.github.io/images/cloud_nat.png"></p>

<p>Now we need to create the template for the Ubuntu VM that we will
connect to it.</p>

<h2>Configuring the GNS3 Template for the Ubuntu VM</h2>

<p>As I mention, we will be using an Ubuntu 16.04 (state of the art!)
Server VM. Don&rsquo;t worry, you won&rsquo;t have to install it. I have pre-package
it into a nice OVA (sorry tested only with VirtualBox, you may need to
do some work if want to use VMware). Download it from
<a href="https://archive.openswitch.net/demos/ubuntu-netlab.ova">here</a>.</p>

<h3>Importing the Image</h3>

<p>After downloading the OVA file, import it into VirtualBox, and then
proceed to create a template in GNS3 for the machine like we <a href="http://opennetgeek.github.io/blog/2016/04/20/using-openswitch-appliance-with-gns3/#install_and_configure">did for
OpenSwitch in the previous
post</a>.
Here is the summary of the steps and configuration:</p>

<ul>
<li>Preferences -> VirtualBox VMs -> New

<ul>
<li>Select the machine you just imported</li>
<li>☑︎ Use as linked base VM</li>
</ul>
</li>
<li>After created click on &lsquo;Edit&rsquo;

<ul>
<li>&lsquo;General settings&rsquo; tab:

<ul>
<li>Template Name: <em>ubuntu-netlab</em></li>
<li>Default name format: <em>{name}-{0}</em></li>
<li>Symbol: <em>:/symbols/vbox_guest.svg</em></li>
<li>Category: <em>End devices</em></li>
<li>RAM: <em>512 MB</em></li>
<li>☑︎ Enable remote console</li>
<li>☐ Enable ACPI shutdown</li>
<li>☑︎ Start VM in headless mode</li>
<li>☑︎ Use as a linked base VM</li>
</ul>
</li>
<li>&lsquo;Network&rsquo; tab:

<ul>
<li>Adapters: <em>2</em></li>
<li>First port name: <em>leave empty</em></li>
<li>Name format: <em>eth{0}</em></li>
<li>Segment size: 0</li>
<li>Type: <em>PCNet-FAST III (Am79c973)</em></li>
<li>☑︎ Allow GNS3 to use any configured VirtualBox adapter</li>
</ul>
</li>
</ul>
</li>
</ul>


<p>Now you can drag an instance of it into your project and setup the
connections as detailed previously. This image is configured with serial
port console enabled, so after starting the VM, you can open the console
from GNS3 and get access. The default user/password is ubuntu/ubuntu.</p>

<div class="callout bottom-left">
Be sure to connect this VM to the NAT interface of the cloud element
first, so that it gets a DHCP response, otherwise it will be blocked
during the boot process until it times out, and you won't see any output
on the serial console. If you have doubt your setup is working, you can
disable the 'headless' setting on the machine and look at the VGA
console of the box.
</div>


<h2>Setting up the Ubuntu VM</h2>

<h3>Initial Setup</h3>

<p>Now that you have access to the console, let&rsquo;s do some initial setup.
First you may want to tell the serial terminal the size so that the
output is not messed up. In my case I just sized my console window to
120 columns and 35 lines (I use the OS X Terminal app, and the tittle
usually says the dimensions):</p>

<figure class='code'><div class="highlight"><table><tr><td class="gutter"><pre class="line-numbers"><span class='line-number'>1</span>
</pre></td><td class='code'><pre><code class=''><span class='line'>stty cols 120 rows 35</span></code></pre></td></tr></table></div></figure>


<p>Next we want to install the latest software updates for this image:</p>

<div class="callout top-left">
For the sake of simplicity I assume you are not behind a corporate
firewall, but if you do, you want to set the http_proxy and
http_proxy variables, and when invoking sudo, pass the -E parameter
to inherit these variables.
</div>


<figure class='code'><div class="highlight"><table><tr><td class="gutter"><pre class="line-numbers"><span class='line-number'>1</span>
<span class='line-number'>2</span>
</pre></td><td class='code'><pre><code class=''><span class='line'>sudo apt update
</span><span class='line'>sudo apt upgrade</span></code></pre></td></tr></table></div></figure>


<h3>Network Setup</h3>

<p>Next, we want to configure the second network interface facing towards
SW1. You will have to run the ifconfig command to find the name of the
second interface:</p>

<figure class='code'><div class="highlight"><table><tr><td class="gutter"><pre class="line-numbers"><span class='line-number'>1</span>
</pre></td><td class='code'><pre><code class=''><span class='line'>ifconfig -a</span></code></pre></td></tr></table></div></figure>


<p>On this case my second interface is called enp0s8. I will then configure
the interface to an static IP address and bring the interface up:</p>

<figure class='code'><div class="highlight"><table><tr><td class="gutter"><pre class="line-numbers"><span class='line-number'>1</span>
<span class='line-number'>2</span>
<span class='line-number'>3</span>
<span class='line-number'>4</span>
<span class='line-number'>5</span>
<span class='line-number'>6</span>
<span class='line-number'>7</span>
<span class='line-number'>8</span>
<span class='line-number'>9</span>
<span class='line-number'>10</span>
<span class='line-number'>11</span>
<span class='line-number'>12</span>
</pre></td><td class='code'><pre><code class=''><span class='line'>sudo su -
</span><span class='line'>cat &lt;&lt;EOF &gt;&gt;/etc/network/interfaces
</span><span class='line'>
</span><span class='line'>auto enp0s8
</span><span class='line'>iface enp0s8 inet static
</span><span class='line'>   address 192.168.1.1
</span><span class='line'>   netmask 255.255.255.0
</span><span class='line'>
</span><span class='line'>EOF
</span><span class='line'>exit #leave sudo
</span><span class='line'>
</span><span class='line'>sudo ifup enp0s8</span></code></pre></td></tr></table></div></figure>


<h3>DHCP Server and DNS Relay</h3>

<p>Next we want to install the DHPC server and DNS relay (DNSmasq)</p>

<figure class='code'><div class="highlight"><table><tr><td class="gutter"><pre class="line-numbers"><span class='line-number'>1</span>
</pre></td><td class='code'><pre><code class=''><span class='line'>sudo apt install isc-dhcp-server dnsmasq</span></code></pre></td></tr></table></div></figure>


<p>Then proceed to configure the dhcp server modifying the file
<em>/etc/dhcp/dhcpd.conf</em> with your favorite editor (if you are not a <em>vim</em>
expert, the <em>nano</em> text editor could be easier). This are the contents
you will need:</p>

<figure class='code'><div class="highlight"><table><tr><td class="gutter"><pre class="line-numbers"><span class='line-number'>1</span>
<span class='line-number'>2</span>
<span class='line-number'>3</span>
<span class='line-number'>4</span>
<span class='line-number'>5</span>
<span class='line-number'>6</span>
</pre></td><td class='code'><pre><code class=''><span class='line'>option domain-name "dc-lab";
</span><span class='line'>option domain-name-servers 192.168.1.1;
</span><span class='line'>subnet 192.168.1.0 netmask 255.255.255.0 {
</span><span class='line'>  range 192.168.1.10 192.168.1.50;
</span><span class='line'>  option routers 192.168.1.1;
</span><span class='line'>}</span></code></pre></td></tr></table></div></figure>


<p>Now you can start the server:</p>

<figure class='code'><div class="highlight"><table><tr><td class="gutter"><pre class="line-numbers"><span class='line-number'>1</span>
</pre></td><td class='code'><pre><code class=''><span class='line'>systemctl start isc-dhcp-server</span></code></pre></td></tr></table></div></figure>


<h3>IP Masquerading (NAT)</h3>

<p>If you want the OpenSwitch boxes to have access to the external
network over the management port, you may want to enable IP masquerading
on the box. Adjust the following script to the name of your network
interfaces:</p>

<figure class='code'><div class="highlight"><table><tr><td class="gutter"><pre class="line-numbers"><span class='line-number'>1</span>
<span class='line-number'>2</span>
<span class='line-number'>3</span>
<span class='line-number'>4</span>
<span class='line-number'>5</span>
<span class='line-number'>6</span>
</pre></td><td class='code'><pre><code class=''><span class='line'>public_if=enp0s3
</span><span class='line'>private_if=enp0s8
</span><span class='line'>sudo -E iptables -t nat -A POSTROUTING -o $public_if -j MASQUERADE
</span><span class='line'>sudo -E iptables -A FORWARD -i $public_if -o $private_if -m state --state RELATED,ESTABLISHED -j ACCEPT
</span><span class='line'>sudo -E iptables -A FORWARD -i $private_if -o $public_if -j ACCEPT
</span><span class='line'>sudo sysctl -w net.ipv4.ip_forward=1</span></code></pre></td></tr></table></div></figure>


<h2>Setting up the Fabric Switches</h2>

<p>Now that we have the Cloud element and the Ubuntu VM, you need to drag
the GNS3 ethernet switch element to connect the second interface from
the Ubuntu VM with it, along with all the management ports of the
OpenSwitch instances. You can now proceed to power up the OpenSwitch
instances and login into their consoles (user/password is netop), and
verify the management interface got an IP address from our control VM:</p>

<figure class='code'><div class="highlight"><table><tr><td class="gutter"><pre class="line-numbers"><span class='line-number'>1</span>
<span class='line-number'>2</span>
<span class='line-number'>3</span>
<span class='line-number'>4</span>
<span class='line-number'>5</span>
<span class='line-number'>6</span>
<span class='line-number'>7</span>
<span class='line-number'>8</span>
<span class='line-number'>9</span>
<span class='line-number'>10</span>
</pre></td><td class='code'><pre><code class=''><span class='line'>switch# show interface mgmt 
</span><span class='line'>  Address Mode : dhcp
</span><span class='line'>  IPv4 address/subnet-mask : 192.168.1.11/24
</span><span class='line'>  Default gateway IPv4 : 192.168.1.1
</span><span class='line'>  IPv6 address/prefix : 
</span><span class='line'>  IPv6 link local address/prefix: fe80::a00:27ff:fe3a:efdd/64
</span><span class='line'>  Default gateway IPv6 : 
</span><span class='line'>  Primary Nameserver : 192.168.1.1
</span><span class='line'>  Secondary Nameserver : 
</span><span class='line'>switch#</span></code></pre></td></tr></table></div></figure>


<div class="callout bottom-left">
Unfortunately OpenSwitch Simulator still has the <a href="https://tree.taiga.io/project/openswitch/issue/840">bug I mentioned
previously</a> and sometimes it may fail during initialization. If you stumble with this,
just restart the VM.
</div>


<p>You may also test login with user root (no password) into a bash shell
and the networking of the management domain should be able to reach the
external network.</p>

<h2>Next Steps</h2>

<p>Now that we have a management network up an running, we want to
configure the fabric to move packets around. At this point most
networking engineers will log into the CLI and start configuring, but we
went thru all this setup of a management network to do something more
interesting&hellip;</p>

<p>In our next post we will do this instead using Ansible,
which is a pretty good tool for managing
<a href="http://www.theregister.co.uk/2013/03/18/servers_pets_or_cattle_cern/">cattle</a>.</p>
]]></content>
  </entry>
  
  <entry>
    <title type="html"><![CDATA[Using OpenSwitch Appliance With GNS3]]></title>
    <link href="http://opennetgeek.github.io/blog/2016/04/20/using-openswitch-appliance-with-gns3/"/>
    <updated>2016-04-20T18:52:32-06:00</updated>
    <id>http://opennetgeek.github.io/blog/2016/04/20/using-openswitch-appliance-with-gns3</id>
    <content type="html"><![CDATA[<p><img class="center no-border" src="http://opennetgeek.github.io/images/openswitchstencilbig1.png"></p>

<p><strong>Note</strong>: This article was <a href="https://opennetgeek.wordpress.com/2016/04/20/using-openswitch-appliance-with-gns3/">originally published here</a>.</p>

<p><strong>Update:</strong>This post has been updated to account for some recent changes
in the appliance configuration (support for up to 7 front ports). In
my <a href="http://opennetgeek.github.io/blog/2016/04/19/developing-openswitch-with-linux-vm-slash-os-x-host/">previous
post</a> I
described my developer setup to work with OpenSwitch. At the end of my
post I showed how to download the build system, and configure and build
an &lsquo;appliance&rsquo; image.</p>

<h2>What Is An OpenSwitch Appliance?</h2>

<p>The appliance is a virtual machine image (in OVA format) that could be
run on VirtualBox or VMware (on this articule I will focus on
VirtualBox) and provides a software datapath (based in OVS right now,
but P4 support it&rsquo;s landing soon). All the rest of the OpenSwitch stack
is the same that you will see in a real hardware, and obviously the
software datapath has certain limitations and features not implemented.</p>

<p>Despite his limitations, the appliance is a really nice way to get your
hands into OpenSwitch without having real hardware.</p>

<p>If you are using the development environment, you can find the appliance .ova file on the
images directory after completing the build, but otherwise you can also
download a periodic image from the <a href="https://archive.openswitch.net/artifacts/periodic/master/latest/appliance/">project
archives</a> (keep
in mind this is a developer snapshot, so things may be broken or
uncomplete sometimes).</p>

<p>The Appliance has currently <del>4</del> <a href="https://review.openswitch.net/#/c/7859/">8</a>
network ports (this is the max number of interfaces supported by VirtualBox): eth0 to eth7. The
port &lsquo;eth0&rsquo; will be the management port, and the other ones are &lsquo;front
ports&rsquo;.</p>

<h2>How To Use The Appliance?</h2>

<!--more-->


<p>The first good use for the appliance is that you can import it into
VirtualBox, and by using &lsquo;bridged&rsquo; interface with a dedicated NIC (for
example an USB ethernet dongle), you can make the appliance talk with a
real piece of hardware, like a traditional router. This allows you to
play with LLDP, BGP, OSPF, etc. I won&rsquo;t go into details of a setup like
this for this article, and is left as exercise to the reader.</p>

<p>In the previous scenario, using one Appliance was nice, but how about using
multiple appliances together? Like creating a virtual CLOS? For that we
will be using GNS3.</p>

<p>If you never heard of <a href="https://www.gns3.com">GNS3</a> before, is an Open Source platform to
create virtual networks and deployments inside your laptop, with some
nice UI. Even more useful, it&rsquo;s cross platform. I will be focusing my
demo here on using it over Mac, but should be easy to extrapolate if you
are a Windows user.</p>

<h2>Setup OpenSwitch Appliance On VirtualBox for GNS3</h2>

<p>In order to use the appliance with GNS3, you need to import the OVA file
into VirtualBox (File -> Import Appliance). The OVA generated by
OpenSwitch is compatible out of the box with GNS3 since April 26th 2016.</p>

<h3><a name="install_and_configure">Installing And Configuring GNS3</a></h3>

<p>First, <a href="https://www.gns3.com/software/download">download GNS3</a> from
their project page and install it (yes, you have to register). Next, I
recommend that you <a href="https://www.wireshark.org/download.html">install
Wireshark</a> to have the
capabilities of snooping on the traffic of the virtual network.</p>

<p>On recent OS X, when trying to run the GNS3 application you may get an
error message:</p>

<pre><code>“GNS3” is damaged and can’t be opened
</code></pre>

<p>This is a wrong error message, and the problem is really that you need
to reduce the security of the system to allow executing applications
that are not from the App Store. You can change this setting on: System
Preferences -> Security &amp; Privacy -> Allow apps download from:
Anywhere.</p>

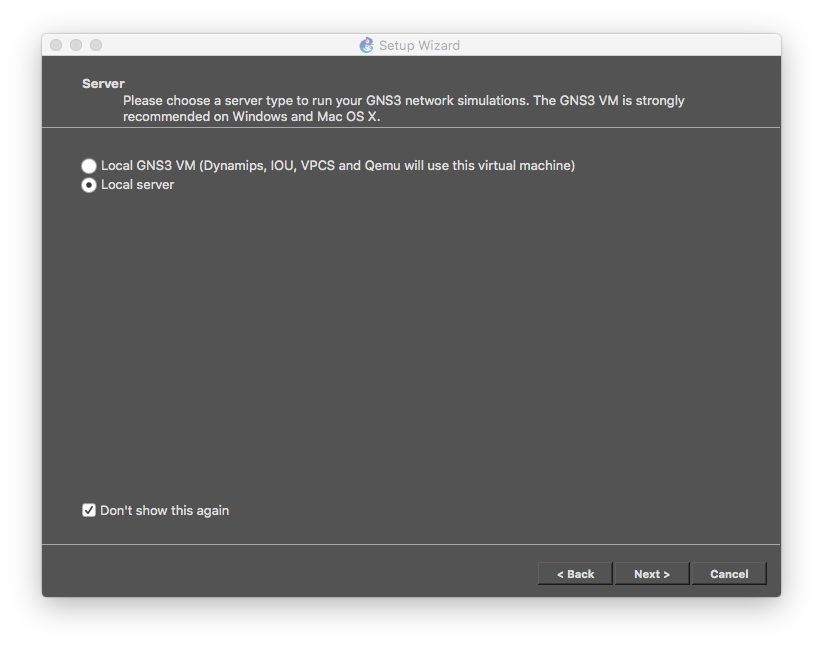
<p>When you first start GNS3, it will start the Setup Wizard, and
ask for a server. Select the &lsquo;Local server&rsquo;. We would not need the GNS3
VM for running the OpenSwitch appliance, since will be run on top of
VirtualBox.</p>

<p><img class="center no-border" src="http://opennetgeek.github.io/images/gns3-setup-1.png"></p>

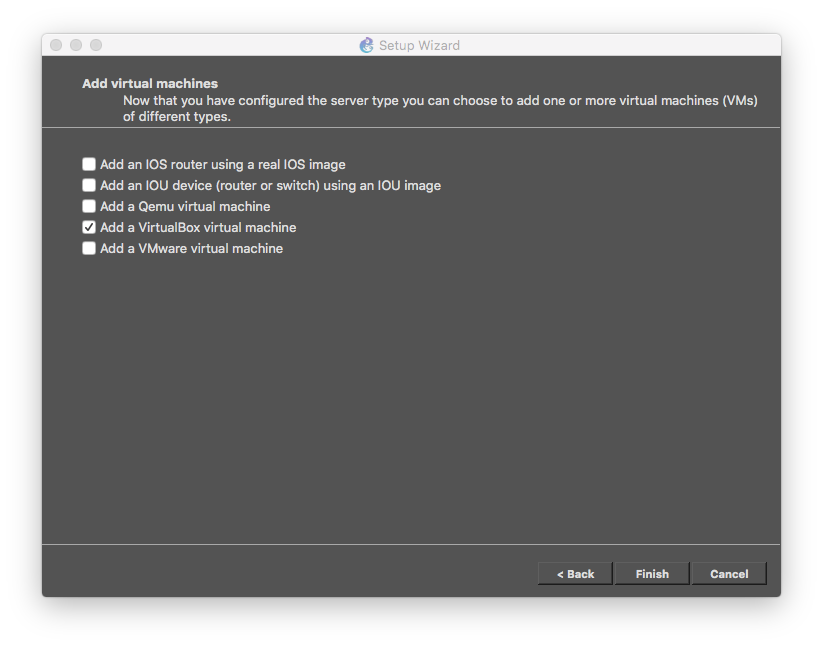
<p>On the next window select to &lsquo;Add a VirtualBox virtual machine&rsquo; (at this
point you should have already imported the OpenSwitch Appliance into
VirtualBox for this to work).</p>

<p><img class="center no-border" src="http://opennetgeek.github.io/images/gns3-setup-2.png"></p>

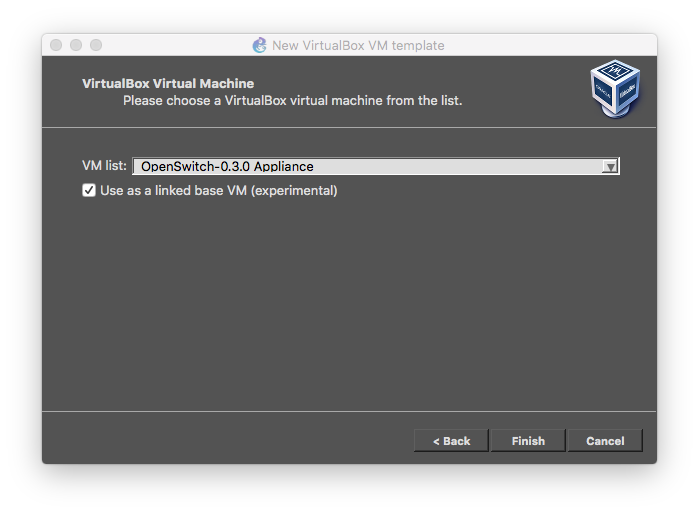
<p>Next, select the OpenSwitch Appliance Image that was imported into
VirtualBox, and enable &ldquo;Use as linked base VM&rdquo;.</p>

<p><img class="center no-border" src="http://opennetgeek.github.io/images/ops-setup-1.png"></p>

<p>After of click on &lsquo;Finish&rsquo;, the preference panel for VirtualBox VMs will
show and you will have to edit the recently created template to add some
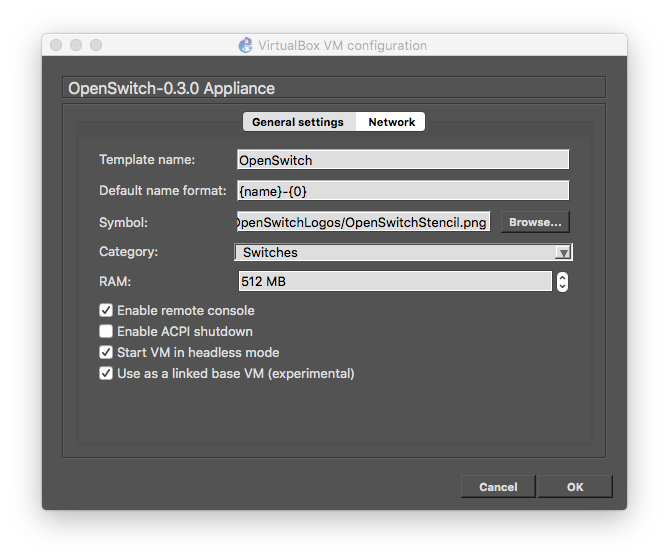
custom configuration: On the &lsquo;General Settings&rsquo; tab:</p>

<ul>
<li>Template Name: <em>OpenSwitch</em></li>
<li>Default name format: <em>{name}-{0}</em></li>
<li>Symbol: <em>/local/path/to/<a href="https://archive.openswitch.net/logo/OpenSwitchStencil.png">OpenSwitchStencil.png</a></em></li>
<li>Category: <em>Switches</em></li>
<li>RAM: <em>512 MB</em></li>
<li>☑︎ Enable remote console</li>
<li>☐ Enable ACPI shutdown</li>
<li>☑︎ Start VM in headless mode</li>
<li>☑︎ Use as a linked base VM</li>
</ul>


<p><img class="center no-border" src="http://opennetgeek.github.io/images/ops-setup-2.png"></p>

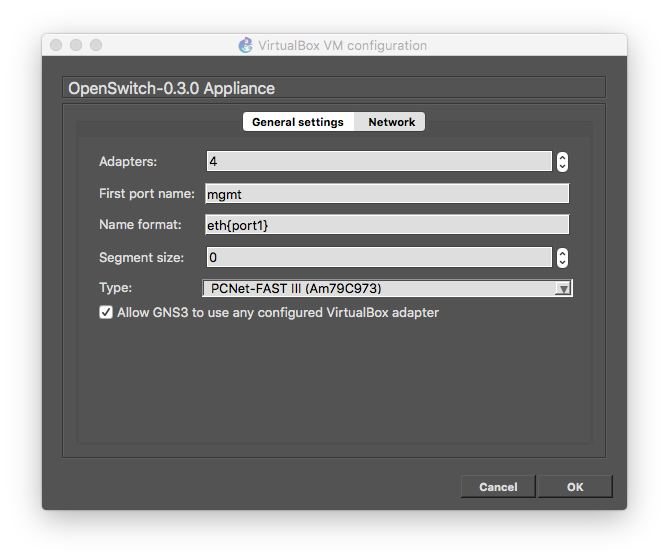
<p>On the &lsquo;Network&rsquo; tab:</p>

<ul>
<li>Adapters: <em>8</em></li>
<li>First port name: <em>mgmt</em></li>
<li>Name format: <em>eth{port1}</em></li>
<li>Segment size: <em>0</em></li>
<li>Type: <em>PCNet-FAST III (Am79c973)</em></li>
<li>☑︎ Allow GNS3 to use any configured VirtualBox adapter</li>
</ul>


<p><img class="center no-border" src="http://opennetgeek.github.io/images/ops-setup-3.png"></p>

<h2>Creating A Simple Connection Between Two Appliance Instances</h2>

<p>Now, it&rsquo;s time to deploy two instances and verify connectivity between
them:</p>

<ul>
<li>Create a new project and save it (the linked VM won&rsquo;t work on
temporal projects).</li>
<li>Click on the &lsquo;Browse all devices&rsquo; button on the left panel to show
the available devices, then drag two OpenSwitch instances into the
canvas (you can see in your VirtualBox UI that two new virtual
machines are created).</li>
<li>Use the &lsquo;Add link&rsquo; tool from the left panel (the one that looks like
a cable with an RJ45 plug) to connect the two instances over the
eth1 port of both.</li>
</ul>


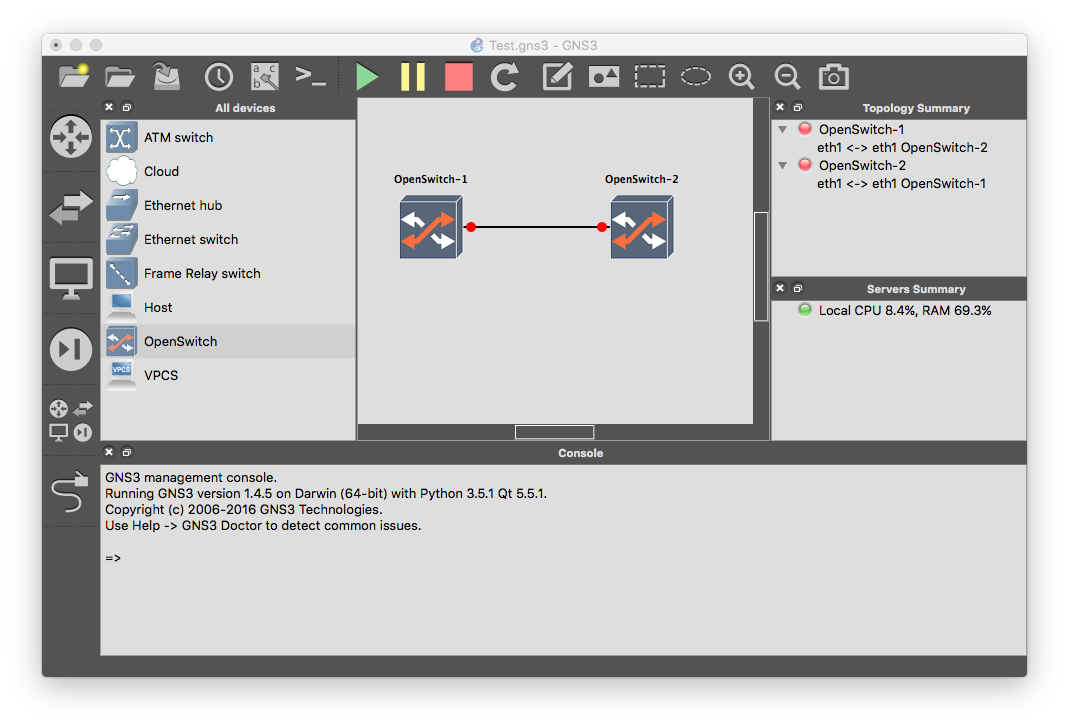
<p>At the end of this setup your project should look like this:</p>

<p><img class="center no-border" src="http://opennetgeek.github.io/images/project-1.png"></p>

<p>Before starting the simulation, I will attach wireshark to one of the
interfaces to see the packets between the machines:</p>

<ul>
<li>Right click on one of side of the links and select &lsquo;Start capture&rsquo;.
This will create a pipe that will output the contents into a pcap
file that wireshark can feed from. This can only be done when the
link is down, so you need to start the captures before turning on
the VM.</li>
</ul>


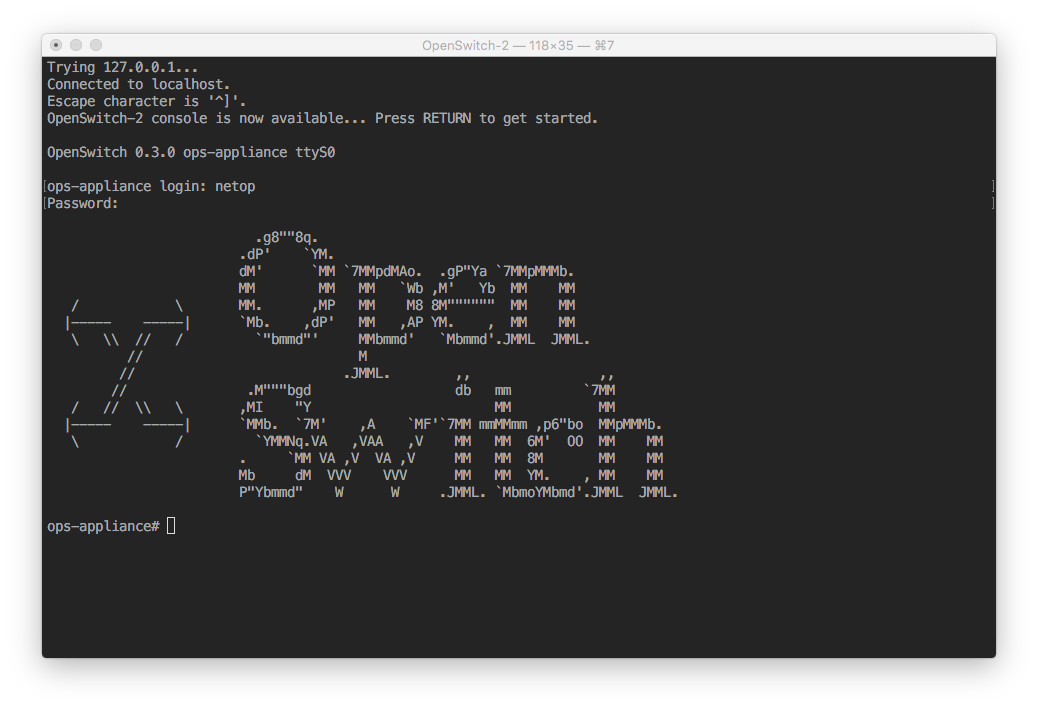
<p>Now you can start your machines by hitting the top &lsquo;Play&rsquo; button. This
will start both VMs. Then you can double click on both machines and a
Terminal will open where you get access to the serial console of the
machine. You can login with the user and password &lsquo;netop&rsquo; (this will
enter into the traditional CLI mode, but you can also login as root into
a bash shell):</p>

<p><img class="center no-border" src="http://opennetgeek.github.io/images/console-1.png"></p>

<p>At this point you can right click on the link where we are capturing the
traffic, and select &lsquo;Start Wireshark&rsquo;. This will open a WireShark window
that is feeding from the pcap capture of the traffic from the port.</p>

<p><strong>Note</strong>: There is currently an open
<a href="https://tree.taiga.io/project/openswitch/issue/840">bug</a> in OpenSwitch
where the image may fail to boot properly the data path. To validate
your appliance booted properly run the following command:</p>

<figure class='code'><div class="highlight"><table><tr><td class="gutter"><pre class="line-numbers"><span class='line-number'>1</span>
</pre></td><td class='code'><pre><code class=''><span class='line'># show interface eth1</span></code></pre></td></tr></table></div></figure>


<p>If the reported MAC address is (null), then reboot the appliance and
check again. I will update this blog as soon as the bug is closed.</p>

<p>Now is time to see some traffic flowing between the machines: let&rsquo;s enable
LLDP on both ports, and we should be able to see both switches
identifying each other, and the traffic flowing thru Wireshark. Let&rsquo;s
issue the following commands on the CLI of both switches:</p>

<figure class='code'><div class="highlight"><table><tr><td class="gutter"><pre class="line-numbers"><span class='line-number'>1</span>
<span class='line-number'>2</span>
<span class='line-number'>3</span>
<span class='line-number'>4</span>
<span class='line-number'>5</span>
<span class='line-number'>6</span>
</pre></td><td class='code'><pre><code class=''><span class='line'>switch# config
</span><span class='line'>switch(config)# interface eth1
</span><span class='line'>switch(config-if)# no shutdown
</span><span class='line'>switch(config-if)# exit
</span><span class='line'>switch(config)# lldp enable
</span><span class='line'>switch(config)# exit</span></code></pre></td></tr></table></div></figure>


<p>After these commands are entered on both switches, we can now show the
LLDP neighbor information on any of the switches:</p>

<figure class='code'><div class="highlight"><table><tr><td class="gutter"><pre class="line-numbers"><span class='line-number'>1</span>
<span class='line-number'>2</span>
<span class='line-number'>3</span>
<span class='line-number'>4</span>
<span class='line-number'>5</span>
<span class='line-number'>6</span>
<span class='line-number'>7</span>
<span class='line-number'>8</span>
<span class='line-number'>9</span>
<span class='line-number'>10</span>
<span class='line-number'>11</span>
<span class='line-number'>12</span>
<span class='line-number'>13</span>
<span class='line-number'>14</span>
</pre></td><td class='code'><pre><code class=''><span class='line'>switch# show lldp neighbor-info eth1
</span><span class='line'>Port                           : eth1
</span><span class='line'>Neighbor entries               : 1
</span><span class='line'>Neighbor entries deleted       : 0
</span><span class='line'>Neighbor entries dropped       : 0
</span><span class='line'>Neighbor entries age-out       : 0
</span><span class='line'>Neighbor Chassis-Name          : switch
</span><span class='line'>Neighbor Chassis-Description   : OpenSwitch 0.3.0 (dill) Linux 3.14.19-yocto-standard #1 SMP PREEMPT Wed Mar 23 00:06:21 UTC 2016 x86_64
</span><span class='line'>Neighbor Chassis-ID            : a2:69:35:48:7b:4d
</span><span class='line'>Neighbor Management-Address    : 
</span><span class='line'>Chassis Capabilities Available : Bridge, Router
</span><span class='line'>Chassis Capabilities Enabled   : Bridge, Router
</span><span class='line'>Neighbor Port-ID               : eth1
</span><span class='line'>TTL                            : 120</span></code></pre></td></tr></table></div></figure>


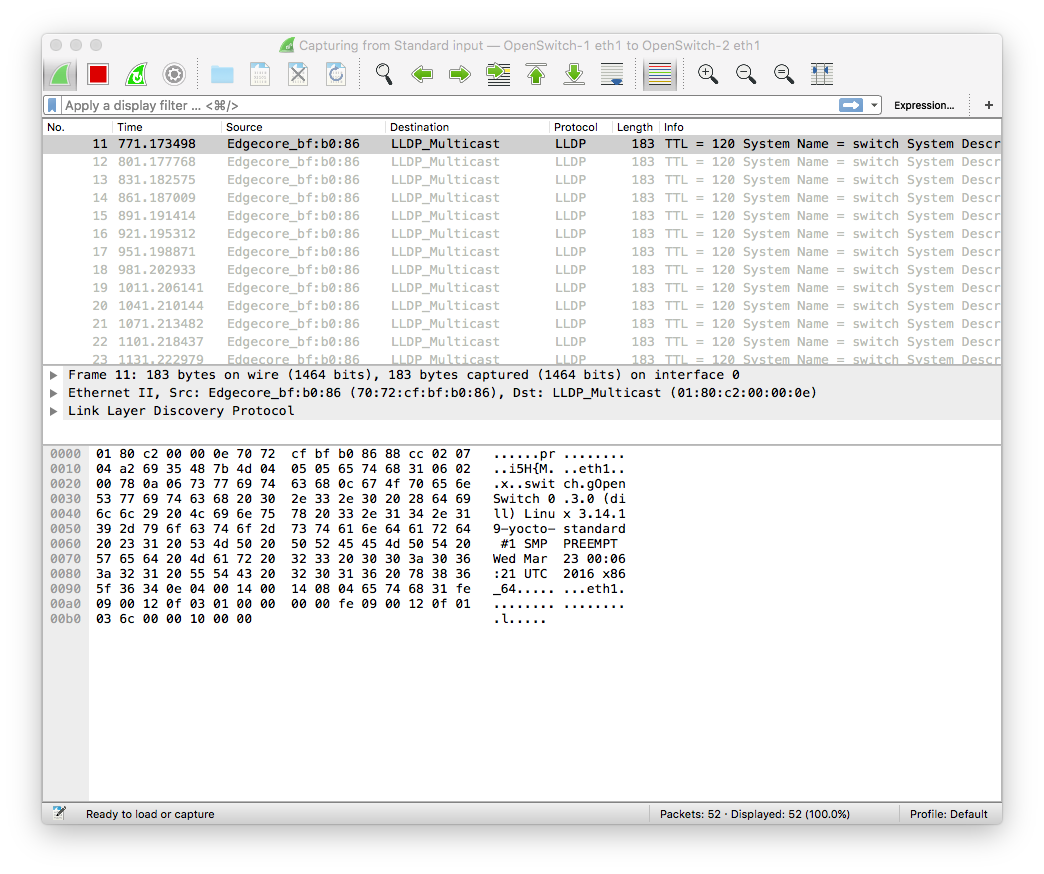
<p>And you can see the LLDP advertisements going thru with Wireshark:</p>

<p><img class="center no-border" src="http://opennetgeek.github.io/images/wireshark.png"></p>

<h2>Conclusions And Next Steps</h2>

<p>That is all the fun that we will have for today, hope you find the
information useful. I&rsquo;m planing to blog soon about the following
subjects:</p>

<ul>
<li>A GNS3 setup of a CLOS network, and pushing the configuration using
Ansible (yay!).</li>
<li>Playing with an appliance using P4.</li>
</ul>


<p>Stay tuned!</p>
]]></content>
  </entry>
  
  <entry>
    <title type="html"><![CDATA[Developing OpenSwitch With Linux VM/OS X Host]]></title>
    <link href="http://opennetgeek.github.io/blog/2016/04/19/developing-openswitch-with-linux-vm-slash-os-x-host/"/>
    <updated>2016-04-19T14:58:23-06:00</updated>
    <id>http://opennetgeek.github.io/blog/2016/04/19/developing-openswitch-with-linux-vm-slash-os-x-host</id>
    <content type="html"><![CDATA[<p><img class="center" src="http://opennetgeek.github.io/images/ops-mac.jpg" title="OpenSwitch on Mac" alt="OpenSwitch on Mac"></p>

<p><strong>Note</strong>: This article was <a href="https://opennetgeek.wordpress.com/2016/04/19/developing-openswitch-with-linux-vmos-x-host/">originally published here</a>.</p>

<p>One of the purposes when we designed the build system in OpenSwitch, was to make it possible to develop on as many environments as possible. If you have some background with developing networking firmware, the typical developer love to have this VM where everything works perfectly, but makes it impossible to work in your laptop at 30000 feet. This is not really a sin (as long as you can have the VM hosted in your machine), but the problem is that usually is some IT team on charge of the VMs setup, and the deployment is not handled by some automated/version-controlled code.</p>

<p>So for OpenSwitch, we aimed to at least document the requirements and steps for manual setup of your environment. You can read <a href="http://www.openswitch.net/documents/dev/linux-setup">this page</a> to get your Linux machine to ready it for OpenSwitch development.</p>

<p>So, why to write an article about my particular setup? Well, I&rsquo;m a Mac user, so in this article I&rsquo;m going to detail my setup using a OS X host with a Linux VM. This provides some nice tricks that makes your workflow easier if you are using a similar setup. I will also explain the rationale of the setup.</p>

<p>My use of Linux VM for development is mostly thru the Linux CLI and I use NFS to share files between my Mac and Linux. This allows me to use any graphical tool from the Linux VM if I have to, but also to use tools from the host without major hurdles.Read more&hellip;</p>

<h2>Setup the VM</h2>

<!--more-->


<p>The first step is that I will use <a href="https://www.virtualbox.org/">VirtualBox</a> to deploy my Linux VM. You can use any software that you want, but VirtualBox is free and available to any developer, so it&rsquo;s a good target.</p>

<p>Since I&rsquo;m using a Macbook Pro Retina with a i7, I will use the following setup:</p>

<ul>
<li>6 Cores: the Yocto build system can take advantage of the multicore environment, so the more cores, the faster builds. This leaves 2 cores idle for my Mac, so performance doesn&rsquo;t suffer.</li>
<li>4Gb of RAM: A full from-scratch build of the compiler (rare, since we use Yocto&rsquo;s shared states) can consume quite a bit of RAM.</li>
<li>20GB of disk: the build directories from Yocto could be big, averaging 6G each, but the figure could easily go up depending on what you are doing. So having some disk space to spare is a good measure (I personally ran with 160GB)</li>
<li>Two network interfaces:

<ul>
<li>First one will be NAT, so that I can reach the internet independent of the network connection on my Mac (sometimes I use wireless, sometimes I use a thunderbolt dock station).</li>
<li>Second one will be host-only adapter, this provides a internal network so that we can easily communicate between the VM and the host. Using multicast DNS (aka Bonjour), we won' even have to worry about IP addresses on this network.</li>
</ul>
</li>
</ul>


<p>For this VM, I will be using <a href="http://mirror.uoregon.edu/ubuntu-releases/14.04.4/ubuntu-14.04.4-server-amd64.iso">Ubuntu LTS 14.04 Server ISO</a>. Right now OpenSwitch works best with this version of Ubuntu (and provides faster build times). We hope to update to the new LTS soon and once we do, I will update this post to reflect that. <strong>Update</strong>: I have added comments about how to make it work with <a href="http://releases.ubuntu.com/16.04/ubuntu-16.04-server-amd64.iso">Ubuntu 16.04</a>!.</p>

<p>I&rsquo;m assuming you are familiar with installing an Ubuntu ISO into a VM and will omit those details. The only important detail from the installation would be to install the SSH server. I would recommend that you setup your user account with the same user id that you have in GitHub (this is a good moment to create one, if you don&rsquo;t). Using the same user account makes life easier with gerrit, but is not an strict requirement.</p>

<h2>Proxy Setup</h2>

<p>If you are behind a corporate firewall, be sure to setup your corporate proxies in your user environment:</p>

<figure class='code'><div class="highlight"><table><tr><td class="gutter"><pre class="line-numbers"><span class='line-number'>1</span>
<span class='line-number'>2</span>
<span class='line-number'>3</span>
<span class='line-number'>4</span>
<span class='line-number'>5</span>
</pre></td><td class='code'><pre><code class=''><span class='line'>cat &lt;&lt;EOF &gt;&gt;~/.profile
</span><span class='line'>export http_proxy=http://your.proxy.com:port
</span><span class='line'>export https_proxy=http://your.proxy.com:port
</span><span class='line'>EOF
</span><span class='line'>source ~/.profile</span></code></pre></td></tr></table></div></figure>


<p>If my case, I may be roaming between the office and home, so sometimes I don&rsquo;t use a proxy, in which case I find easy to unset the variables and be able to work. So, I don&rsquo;t like to wire the apt configuration with the proxy as <a href="http://askubuntu.com/questions/257290/configure-proxy-for-apt">explained here</a>, instead I like to run the apt-get command with &lsquo;sudo -E&rsquo; parameter so that it inherits my environment variables and uses the proxy if I have it defined.</p>

<h2>Initial Setup</h2>

<p>First, I usually disable asking password for my user:</p>

<figure class='code'><div class="highlight"><table><tr><td class="gutter"><pre class="line-numbers"><span class='line-number'>1</span>
</pre></td><td class='code'><pre><code class=''><span class='line'>sudo visudo -f /etc/sudoers.d/passwordless-user</span></code></pre></td></tr></table></div></figure>


<p>Then enter a line like the following (replace your username):</p>

<figure class='code'><div class="highlight"><table><tr><td class="gutter"><pre class="line-numbers"><span class='line-number'>1</span>
</pre></td><td class='code'><pre><code class=''><span class='line'>username ALL=(ALL) NOPASSWD:ALL</span></code></pre></td></tr></table></div></figure>


<p>Next, let&rsquo;s update the apt package cache:</p>

<figure class='code'><div class="highlight"><table><tr><td class="gutter"><pre class="line-numbers"><span class='line-number'>1</span>
</pre></td><td class='code'><pre><code class=''><span class='line'>sudo apt-get update</span></code></pre></td></tr></table></div></figure>


<h2>Networking Setup</h2>

<p>The initial installation will configure the machine out of the box to have DHCP on the first network interface, so we will need to add the second interface for automatic startup. So I will add the following lines to /etc/network/interfaces:</p>

<figure class='code'><div class="highlight"><table><tr><td class="gutter"><pre class="line-numbers"><span class='line-number'>1</span>
<span class='line-number'>2</span>
</pre></td><td class='code'><pre><code class=''><span class='line'>auto eth1
</span><span class='line'>iface eth1 inet dhcp</span></code></pre></td></tr></table></div></figure>


<p>Then, bring the interface up:</p>

<figure class='code'><div class="highlight"><table><tr><td class="gutter"><pre class="line-numbers"><span class='line-number'>1</span>
</pre></td><td class='code'><pre><code class=''><span class='line'>sudo ifup eth1</span></code></pre></td></tr></table></div></figure>


<p><strong>Update</strong>: if you are using 16.04, the network interfaces have different names (to understand why and revert it if you want, take a look here). Run &lsquo;ifconfig -a&rsquo; to find the name of your interfaces.</p>

<p>Next, proceed to install some extra packages and configurations that make networking work better.</p>

<p>dnsmasq: the build system fetches constantly from the servers in order to use the shared states to speed the build. So using a local DNS cache will help reduce the pressure on your DNS (and may save you from raising flags about the high rate of request your machine will be doing).</p>

<figure class='code'><div class="highlight"><table><tr><td class="gutter"><pre class="line-numbers"><span class='line-number'>1</span>
</pre></td><td class='code'><pre><code class=''><span class='line'>sudo apt-get install dnsmasq</span></code></pre></td></tr></table></div></figure>


<p><strong>Update</strong>: if you are using 16.04, dnsmasq won&rsquo;t work out of the box since it conflicts with the dnsmasq used by the LXC container daemon. I worked around by disabling LXC (but maybe that solution doesn&rsquo;t work for you):</p>

<figure class='code'><div class="highlight"><table><tr><td class="gutter"><pre class="line-numbers"><span class='line-number'>1</span>
<span class='line-number'>2</span>
</pre></td><td class='code'><pre><code class=''><span class='line'>sudo systemctl stop lxc lxc-net
</span><span class='line'>sudo systemctl disable lxc lxc-net</span></code></pre></td></tr></table></div></figure>


<p>nss-mdns: this is the name service resolution to use multicast DNS. This allows the Linux machine to resolve (and as side effect of dependencies, advertise) .local addresses and makes communication with the Mac simpler.</p>

<figure class='code'><div class="highlight"><table><tr><td class="gutter"><pre class="line-numbers"><span class='line-number'>1</span>
</pre></td><td class='code'><pre><code class=''><span class='line'>sudo apt-get install libnss-mdns</span></code></pre></td></tr></table></div></figure>


<p>After this is installed, you should be able to reach your machine with the .local name. Lets say your Linux machine is named linuxvm, then you should be able to run from your Mac:</p>

<figure class='code'><div class="highlight"><table><tr><td class="gutter"><pre class="line-numbers"><span class='line-number'>1</span>
</pre></td><td class='code'><pre><code class=''><span class='line'>ping linuxvm.local</span></code></pre></td></tr></table></div></figure>


<h2>Headless VM</h2>

<p>After the initial networking setup is ready, I like to run the VM in headless mode from the OS X terminal. To do that, I shutdown the VM from the VirtualBox UI and close the application. Then from an OS X Terminal I can start the VM in the background with (replace the LinuxVM name with the name of your VM:</p>

<figure class='code'><div class="highlight"><table><tr><td class="gutter"><pre class="line-numbers"><span class='line-number'>1</span>
</pre></td><td class='code'><pre><code class=''><span class='line'>VBoxHeadless --startvm LinuxVM --vrde off &</span></code></pre></td></tr></table></div></figure>


<p>This will run on the background and as long as you don&rsquo;t close the terminal, the VM will run. Next, I usually connect to the VM from the terminal with (using the mDNS .local resolution):</p>

<figure class='code'><div class="highlight"><table><tr><td class="gutter"><pre class="line-numbers"><span class='line-number'>1</span>
</pre></td><td class='code'><pre><code class=''><span class='line'>ssh -Y username@linuxvm.local</span></code></pre></td></tr></table></div></figure>


<p>The -Y automatically exports X11 apps into my Mac XQuartz, in case you want to use some graphical program from Linux.</p>

<h2>OpenSwitch Development Environment Tweaks</h2>

<p>Create a workspace directory on /ws. This is just an standard I follow  of putting all my work on a separate directory. Makes easier to fine-control the NFS exports from my Linux machine into my Mac host.</p>

<figure class='code'><div class="highlight"><table><tr><td class="gutter"><pre class="line-numbers"><span class='line-number'>1</span>
<span class='line-number'>2</span>
</pre></td><td class='code'><pre><code class=''><span class='line'>sudo mkdir /ws
</span><span class='line'>sudo chown $USER /ws</span></code></pre></td></tr></table></div></figure>


<h3>NFS Server Share Setup</h3>

<p>Installing an NFS server with the proper parameters to allow easy sharing of files between the host an the Mac took me several hours of research. Here is the recipe for it.</p>

<p>Install the NFS server daemon:</p>

<figure class='code'><div class="highlight"><table><tr><td class="gutter"><pre class="line-numbers"><span class='line-number'>1</span>
</pre></td><td class='code'><pre><code class=''><span class='line'>sudo apt-get install nfs-kernel-server</span></code></pre></td></tr></table></div></figure>


<p>Configure the /etc/exports file with the following line to allow your Mac host to access the files under /ws with the same user permissions as your Linux user (assuming your user ID is 1000, you can find that with the &lsquo;id&rsquo; command).</p>

<figure class='code'><div class="highlight"><table><tr><td class="gutter"><pre class="line-numbers"><span class='line-number'>1</span>
</pre></td><td class='code'><pre><code class=''><span class='line'>/ws 192.168.56.1(rw,all_squash,anonuid=1000,anongid=1000,sync,no_subtree_check,insecure)</span></code></pre></td></tr></table></div></figure>


<p>Start the NFS server:</p>

<figure class='code'><div class="highlight"><table><tr><td class="gutter"><pre class="line-numbers"><span class='line-number'>1</span>
</pre></td><td class='code'><pre><code class=''><span class='line'>sudo service nfs-kernel-server start</span></code></pre></td></tr></table></div></figure>


<p><strong>Update</strong>: if you are using 16.04 use systemctl instead of service, and the service is called nfs-server:</p>

<figure class='code'><div class="highlight"><table><tr><td class="gutter"><pre class="line-numbers"><span class='line-number'>1</span>
</pre></td><td class='code'><pre><code class=''><span class='line'>sudo systemctl start nfs-server</span></code></pre></td></tr></table></div></figure>


<p>At this point you should be able to mount the NFS directory from your Mac, by going to the Finder Menu Go  -> Connect to Server&hellip; (or using the ⌘k shortcut). On the server address box enter:</p>

<figure class='code'><div class="highlight"><table><tr><td class="gutter"><pre class="line-numbers"><span class='line-number'>1</span>
</pre></td><td class='code'><pre><code class=''><span class='line'>nfs://yourmachine.local/ws</span></code></pre></td></tr></table></div></figure>


<p>That should get your Mac access over NFS to the directory  /ws and will have the right permission mapping so that files could be changed either from the Linux or Mac environment without permissions conflicts.</p>

<h3>Install Docker</h3>

<p>We are going to be using docker, so we need to install it following the instructions <a href="https://docs.docker.com/engine/installation/linux/ubuntulinux/">here</a>.</p>

<p>If you are using a proxy, you need to setup it up for the docker daemon on /etc/default/docker:</p>

<figure class='code'><div class="highlight"><table><tr><td class="gutter"><pre class="line-numbers"><span class='line-number'>1</span>
<span class='line-number'>2</span>
</pre></td><td class='code'><pre><code class=''><span class='line'>export http_proxy=http://your.proxy.com:port
</span><span class='line'>export https_proxy=http://your.proxy.com:port</span></code></pre></td></tr></table></div></figure>


<p>Then, restart your docker to make the changes take effect:</p>

<figure class='code'><div class="highlight"><table><tr><td class="gutter"><pre class="line-numbers"><span class='line-number'>1</span>
</pre></td><td class='code'><pre><code class=''><span class='line'>sudo service docker restart</span></code></pre></td></tr></table></div></figure>


<h3>Prepare for  OpenSwitch Build Environment</h3>

<p>Install the minimal required packages for OpenSwitch development:</p>

<figure class='code'><div class="highlight"><table><tr><td class="gutter"><pre class="line-numbers"><span class='line-number'>1</span>
</pre></td><td class='code'><pre><code class=''><span class='line'>sudo apt-get install gawk wget git-core diffstat unzip texinfo gcc-multilib build-essential chrpath screen curl device-tree-compiler git-review</span></code></pre></td></tr></table></div></figure>


<p>OpenSwitch leverages Yocto&rsquo;s shared-state system, so we want to have a global shared state directory that is shared across all the development environments to speed build time. The OpenSwitch build system will get this information automatically from a variable environment, so I will put it on my profile by default:</p>

<figure class='code'><div class="highlight"><table><tr><td class="gutter"><pre class="line-numbers"><span class='line-number'>1</span>
<span class='line-number'>2</span>
<span class='line-number'>3</span>
<span class='line-number'>4</span>
</pre></td><td class='code'><pre><code class=''><span class='line'>sudo mkdir /ws/openswitch-sstate-cache /ws/openswitch-downloads
</span><span class='line'>sudo chown $USER /ws/openswitch-sstate-cache /ws/openswitch-downloads
</span><span class='line'>echo -e "export SSTATE_DIR=/ws/openswitch-sstate-cache\nexport DL_DIR=/ws/openswitch-downloads" &gt;&gt; ~/.profile
</span><span class='line'>source ~/.profile</span></code></pre></td></tr></table></div></figure>


<h2>Git And Gerrit Setup</h2>

<p>Setup some initial git setup for working with <a href="https://review.openswitch.net/">OpenSwitch Gerrit</a>. You will need a GitHub account in order to login into gerrit, so I will assume you already have one, and you know how to upload your ssh key into gerrit. You will also need to sign a <a href="http://elinux.org/Developer_Certificate_Of_Origin">DCO</a> when signing for Gerrit, otherwise won&rsquo;t be able to upload code for review (if you are going to contribute as part of your job, you need to follow the steps on the OpenSwitch page to get your employer to sing a corporate contribution agreement).</p>

<p>First, setup git (I like to use colors, and use st as an alias for status):</p>

<figure class='code'><div class="highlight"><table><tr><td class="gutter"><pre class="line-numbers"><span class='line-number'>1</span>
<span class='line-number'>2</span>
<span class='line-number'>3</span>
<span class='line-number'>4</span>
</pre></td><td class='code'><pre><code class=''><span class='line'>git config --global user.name "John Doe"
</span><span class='line'>git config --global user.email johndoe@example.com
</span><span class='line'>git config --global alias.st status
</span><span class='line'>git config --global color.ui auto</span></code></pre></td></tr></table></div></figure>


<p>If you are working behind a corporate firewall, it may be that gerrit ports (29418) are blocked. You can test a telnet connection into the port to confirm if you are blocked. A workaround this restriction is to install socat and use a proxy for the ssh connection:</p>

<figure class='code'><div class="highlight"><table><tr><td class="gutter"><pre class="line-numbers"><span class='line-number'>1</span>
<span class='line-number'>2</span>
<span class='line-number'>3</span>
<span class='line-number'>4</span>
<span class='line-number'>5</span>
<span class='line-number'>6</span>
</pre></td><td class='code'><pre><code class=''><span class='line'>sudo apt-get install socat
</span><span class='line'>cat &lt;&lt;EOF &gt;&gt;~/.ssh/config
</span><span class='line'>Host review.openswitch.net
</span><span class='line'>    IdentityFile ~/.ssh/id_rsa
</span><span class='line'>    ProxyCommand socat - PROXY:your.proxy.com:%h:%p,proxyport=&lt;port&gt;
</span><span class='line'>EOF</span></code></pre></td></tr></table></div></figure>


<p>If your github username is different from the username in your machine, you may want to configure git to use the right username when doing git reviews:</p>

<figure class='code'><div class="highlight"><table><tr><td class="gutter"><pre class="line-numbers"><span class='line-number'>1</span>
</pre></td><td class='code'><pre><code class=''><span class='line'>git config --global gitreview.username &lt;username&gt;</span></code></pre></td></tr></table></div></figure>


<p>You can verify your connection to gerrit works by issuing this command and getting a similar output:</p>

<figure class='code'><div class="highlight"><table><tr><td class="gutter"><pre class="line-numbers"><span class='line-number'>1</span>
<span class='line-number'>2</span>
<span class='line-number'>3</span>
<span class='line-number'>4</span>
<span class='line-number'>5</span>
<span class='line-number'>6</span>
<span class='line-number'>7</span>
<span class='line-number'>8</span>
<span class='line-number'>9</span>
<span class='line-number'>10</span>
<span class='line-number'>11</span>
<span class='line-number'>12</span>
</pre></td><td class='code'><pre><code class=''><span class='line'>ssh -p 29418 &lt;username&gt;@review.openswitch.net
</span><span class='line'>  ****    Welcome to Gerrit Code Review    ****
</span><span class='line'>
</span><span class='line'>  Hi John Doe, you have successfully connected over SSH.
</span><span class='line'>
</span><span class='line'>  Unfortunately, interactive shells are disabled.
</span><span class='line'>
</span><span class='line'>  To clone a hosted Git repository, use:
</span><span class='line'>
</span><span class='line'>  git clone ssh://&lt;username&gt;@review.openswitch.net:29418/REPOSITORY_NAME.git
</span><span class='line'>
</span><span class='line'>Connection to review.openswitch.net closed.</span></code></pre></td></tr></table></div></figure>


<h2>Building OpenSwitch</h2>

<p>Finally, I&rsquo;m going to clone the OpenSwitch build system, and build an appliance image that I would use in my next post about working OpenSwitch with GNS3.</p>

<p>First I clone the build system:</p>

<figure class='code'><div class="highlight"><table><tr><td class="gutter"><pre class="line-numbers"><span class='line-number'>1</span>
<span class='line-number'>2</span>
<span class='line-number'>3</span>
<span class='line-number'>4</span>
</pre></td><td class='code'><pre><code class=''><span class='line'>git clone https://git.openswitch.net/openswitch/ops-build ops-appliance
</span><span class='line'>cd ops-appliance
</span><span class='line'>make configure appliance
</span><span class='line'>make</span></code></pre></td></tr></table></div></figure>


<p>Now you can sit a wait for the build to complete. If you have a fast internet connection it will take in the order of 15 minutes to download all the caches and sources to build a full OpenSwitch Virtual Appliance. In  my next post we will be using that.</p>

<h2>Conclusion</h2>

<p>I hope the information is useful. Drop me a comment if you think there is any improvement I can do to the environment.</p>
]]></content>
  </entry>
  
  <entry>
    <title type="html"><![CDATA[Starting a Blog on Open Software/Hardware + Networking]]></title>
    <link href="http://opennetgeek.github.io/blog/2016/03/22/starting-a-blog-on-open-software-slash-hardware-plus-networking/"/>
    <updated>2016-03-22T14:51:39-06:00</updated>
    <id>http://opennetgeek.github.io/blog/2016/03/22/starting-a-blog-on-open-software-slash-hardware-plus-networking</id>
    <content type="html"><![CDATA[<p>Today I’m jumping into water to start writing about some area where I have some
half-decent background: the intersection of Open Software/Hardware and Networking.</p>

<h2>Why?</h2>

<p>You see, I’m a software guy. The pragmatical Linux/OpenSource fanboy kind. What
that means? I have a formal degree on Computer Science, and wrote Linux drivers
and software for embedded systems for 8 years. But I’m also a pragmatical guy:
I know how to write kernel drivers, but I use a Mac laptop every day because
I like things to work. For the last 4 years I have been learning a big from
networking at Hewlett Packard Enterprise, where I have worked on networking
(SDN, ASICs), and more recently on the OpenSwitch project.</p>

<!--more-->


<p>Why start writing about the intersection of Open and Networking? These are
interesting times in the networking world: disaggregation, open source,
open hardware, etc. All of this is pretty new for the networking world, and is
specially different because in the old good days you will have limited
information about the technical details of what is going on behind scenes on
your network. Now sharing the knowledge is critical. I have been inspired by
reading blog entries from many in the networking community, and I’m by no
means close to have the expertise of guys like Ivan or Greg, but I think I can
contribute to spreading the knowledge on the little things that I do know.
Hope my readers agree.</p>

<p>Stay tuned for some posts soon. I will be writing quite a bit about OpenSwitch,
but also random thoughts on different areas about Open + Network.</p>
]]></content>
  </entry>
  
</feed>