Setting Up DC Fabric Simulation With OpenSwitch and GNS3
Note: This article was originally published here.
In the previous post I covered the basics about setting up the OpenSwitch Appliance using GNS3. The setup was fairly simple: two switches connected to each other and exchanging LLDP packets. In this post we will setup a more elaborate network to simulate a DC fabric (although it may be a bit overkill of a setup). The setup will be the basis for the next posts about configuring this fabric using Ansible.
One of the first questions when setting up a complex topology with GNS3 that most people will do is: how do I connect it to the external world outside of the simulation? For VirtualBox machines that we are using, the options are limited. The one I found to work reliably across platforms was to use a NAT connection. This has the disadvantage that we have limited connectivity from the external world toward the internal network, but this could be also a security advantage to prevent accidental propagation of control protocols from our simulated environment.
Since the purpose of this lab is going to be to play with Ansible, we are going to need a Linux machine to run it. So, we will setup the following network:
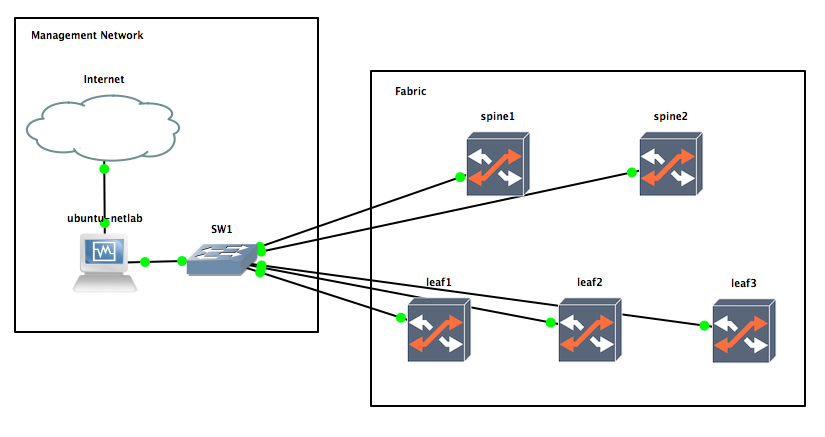
Let’s elaborate on the setup details:
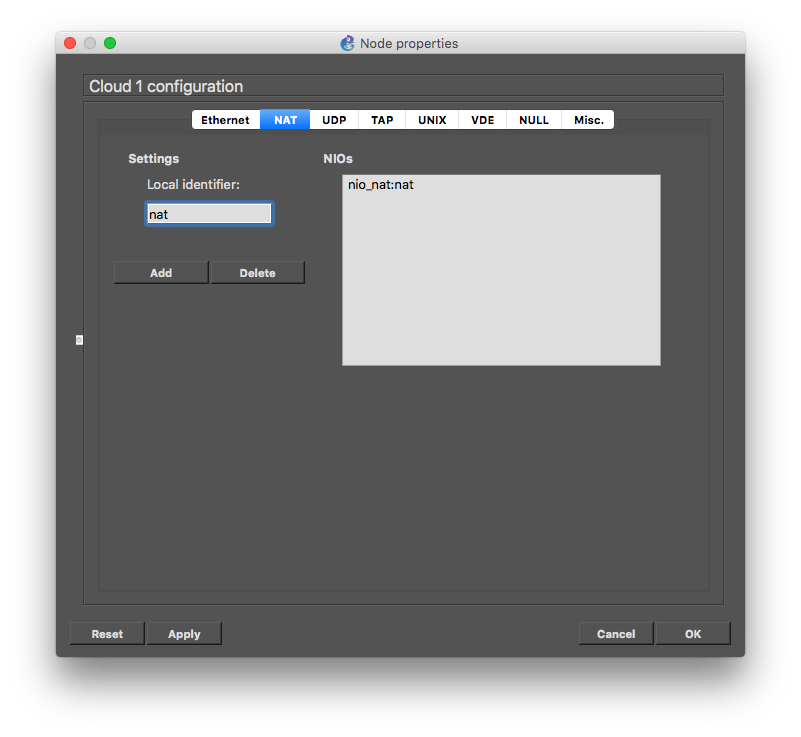
- The ‘Internet’ cloud is a GNS3’s cloud element, that I configured with a NAT entry that I named ‘nat’. The name doesn’t really matter, as GNS3 just need to see a NAT interface on the cloud element, so that the connection to the VM called ‘ubuntu-netlab’ is configured using VirtualBox’s NAT networking.
- The ‘ubuntu-netlab’ is a virtual machine that have Ubuntu 16.04
Server installed on it (instructions about this setup below). This
VM will have two NICs: one attached to the NAT connection
and another one to the SW1 that will be the management network of
the switches. What we will be doing with this machine? Several
things:
- Run a DHCP server to provide IP connectivity to the management network
- Run a DNS relay to minimize disruptions on the configuration (I may be roaming between home/office).
- You may optionally configure IP masquerading (aka NAT) on this
box to allow the OpenSwitch boxes to reach the external world,
but is not really required.
You may be wondering why not connect the management switch directly to the NAT port on the cloud element? I tried this, and found the DHCP server shipping in VirtualBox was not really good, and sometimes will assign the same IP address to different boxes if restarted at a given time (bug with the leases?)
- We will install Ansible on this box, and use it as control machine to configure the fabric
- The SW1 is a GNS3' ethernet switch with 8 ports. One will be connected to the Ubuntu VM, and the other ports to each of the management ports of the OpenSwitch boxes.
- We will use 5 OpenSwitch boxes to create a simple datacenter fabric. I’m calling them spines/leaves for convenience, but I will do examples with plain L2, and other L3 topologies that may not be a CLOS.
So, let’s get started with the setup!
Setup the Management Network
You should start by dragging a cloud element and configuring it to have a network interface of type NAT:
Now we need to create the template for the Ubuntu VM that we will connect to it.
Configuring the GNS3 Template for the Ubuntu VM
As I mention, we will be using an Ubuntu 16.04 (state of the art!) Server VM. Don’t worry, you won’t have to install it. I have pre-package it into a nice OVA (sorry tested only with VirtualBox, you may need to do some work if want to use VMware). Download it from here.
Importing the Image
After downloading the OVA file, import it into VirtualBox, and then proceed to create a template in GNS3 for the machine like we did for OpenSwitch in the previous post. Here is the summary of the steps and configuration:
- Preferences -> VirtualBox VMs -> New
- Select the machine you just imported
- ☑︎ Use as linked base VM
- After created click on ‘Edit’
- ‘General settings’ tab:
- Template Name: ubuntu-netlab
- Default name format: {name}-{0}
- Symbol: :/symbols/vbox_guest.svg
- Category: End devices
- RAM: 512 MB
- ☑︎ Enable remote console
- ☐ Enable ACPI shutdown
- ☑︎ Start VM in headless mode
- ☑︎ Use as a linked base VM
- ‘Network’ tab:
- Adapters: 2
- First port name: leave empty
- Name format: eth{0}
- Segment size: 0
- Type: PCNet-FAST III (Am79c973)
- ☑︎ Allow GNS3 to use any configured VirtualBox adapter
- ‘General settings’ tab:
Now you can drag an instance of it into your project and setup the connections as detailed previously. This image is configured with serial port console enabled, so after starting the VM, you can open the console from GNS3 and get access. The default user/password is ubuntu/ubuntu.
Setting up the Ubuntu VM
Initial Setup
Now that you have access to the console, let’s do some initial setup. First you may want to tell the serial terminal the size so that the output is not messed up. In my case I just sized my console window to 120 columns and 35 lines (I use the OS X Terminal app, and the tittle usually says the dimensions):
1
| |
Next we want to install the latest software updates for this image:
1 2 | |
Network Setup
Next, we want to configure the second network interface facing towards SW1. You will have to run the ifconfig command to find the name of the second interface:
1
| |
On this case my second interface is called enp0s8. I will then configure the interface to an static IP address and bring the interface up:
1 2 3 4 5 6 7 8 9 10 11 12 | |
DHCP Server and DNS Relay
Next we want to install the DHPC server and DNS relay (DNSmasq)
1
| |
Then proceed to configure the dhcp server modifying the file /etc/dhcp/dhcpd.conf with your favorite editor (if you are not a vim expert, the nano text editor could be easier). This are the contents you will need:
1 2 3 4 5 6 | |
Now you can start the server:
1
| |
IP Masquerading (NAT)
If you want the OpenSwitch boxes to have access to the external network over the management port, you may want to enable IP masquerading on the box. Adjust the following script to the name of your network interfaces:
1 2 3 4 5 6 | |
Setting up the Fabric Switches
Now that we have the Cloud element and the Ubuntu VM, you need to drag the GNS3 ethernet switch element to connect the second interface from the Ubuntu VM with it, along with all the management ports of the OpenSwitch instances. You can now proceed to power up the OpenSwitch instances and login into their consoles (user/password is netop), and verify the management interface got an IP address from our control VM:
1 2 3 4 5 6 7 8 9 10 | |
You may also test login with user root (no password) into a bash shell and the networking of the management domain should be able to reach the external network.
Next Steps
Now that we have a management network up an running, we want to configure the fabric to move packets around. At this point most networking engineers will log into the CLI and start configuring, but we went thru all this setup of a management network to do something more interesting…
In our next post we will do this instead using Ansible, which is a pretty good tool for managing cattle.